Automating Octo Browser using API — a complete guide


Valentin Kirmond
Technical Support Specialist, Octo Browser
Octo Browser is an anti-detect browser designed to help you work securely and conveniently with multiple accounts. It allows you to create unique digital fingerprints for every profile, protecting you from detection and blocks. Octo Browser is ideal for multi-accounting on any platform: Amazon, CoinList, Facebook, TikTok, Winline, and many others.
When the number of profiles grows into dozens or hundreds and tasks become repetitive, managing everything manually stops being effective. That’s what the API is for — it lets you automate work with profiles, proxies, and other entities. In this article, we’ll look at the available automation options in Octo Browser.
Contents
Manage any number of accounts without bans, routine, and unnecessary expenses.
Would you like to try Octo Browser at discount?
Use the promo code OCTOBLOG to get 30% off any subscription. This offer is valid only for new users.
What an API is
An API (Application Programming Interface) is a programming interface that allows software systems to communicate. Think of it like a restaurant: you place an order, the waiter takes it to the kitchen, and brings back the dish. The same happens when your application sends a request through the API and receives a response from the Octo Browser server.
HTTP requests
API communication happens through HTTP requests — messages a client sends to a server to request or transfer data.
Main HTTP methods
Method | Purpose | Example |
|---|---|---|
POST | Create new data | Create a new profile |
GET | Retrieve data | Get the full list of profiles in an Octo Browser account |
PATCH | Modify/update existing data | Change a profile name |
DELETE | Delete data (resource) | Delete a profile |
Request structure
Every request consists of several components:
URL: where the request is sent.
Method: what we want to do (GET, POST, etc.).
Headers: additional request information (for example, an API token).
Body: the data we send (for example, information for a new profile).
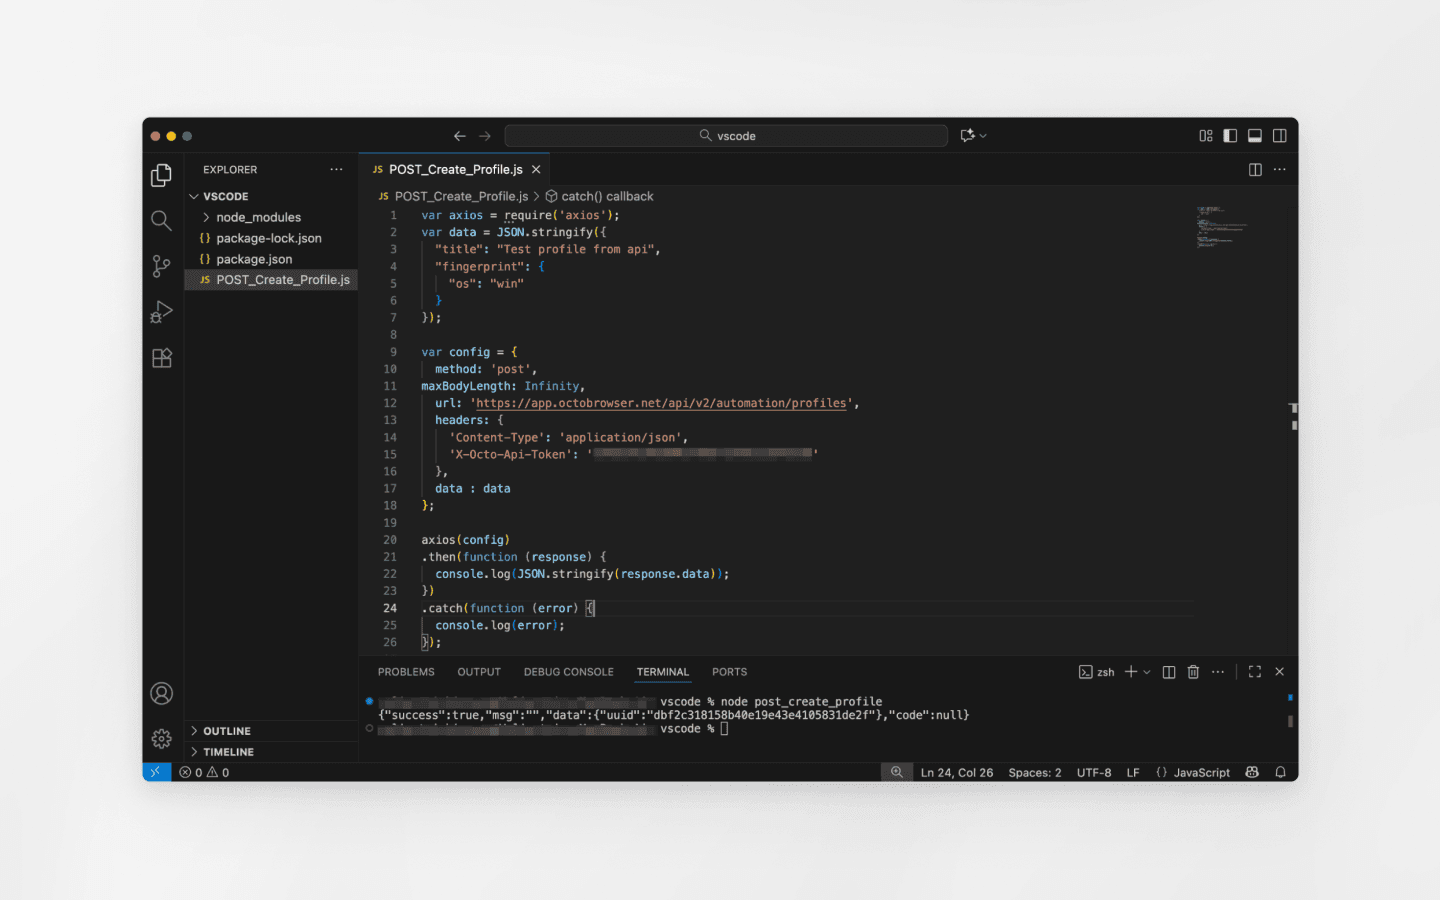
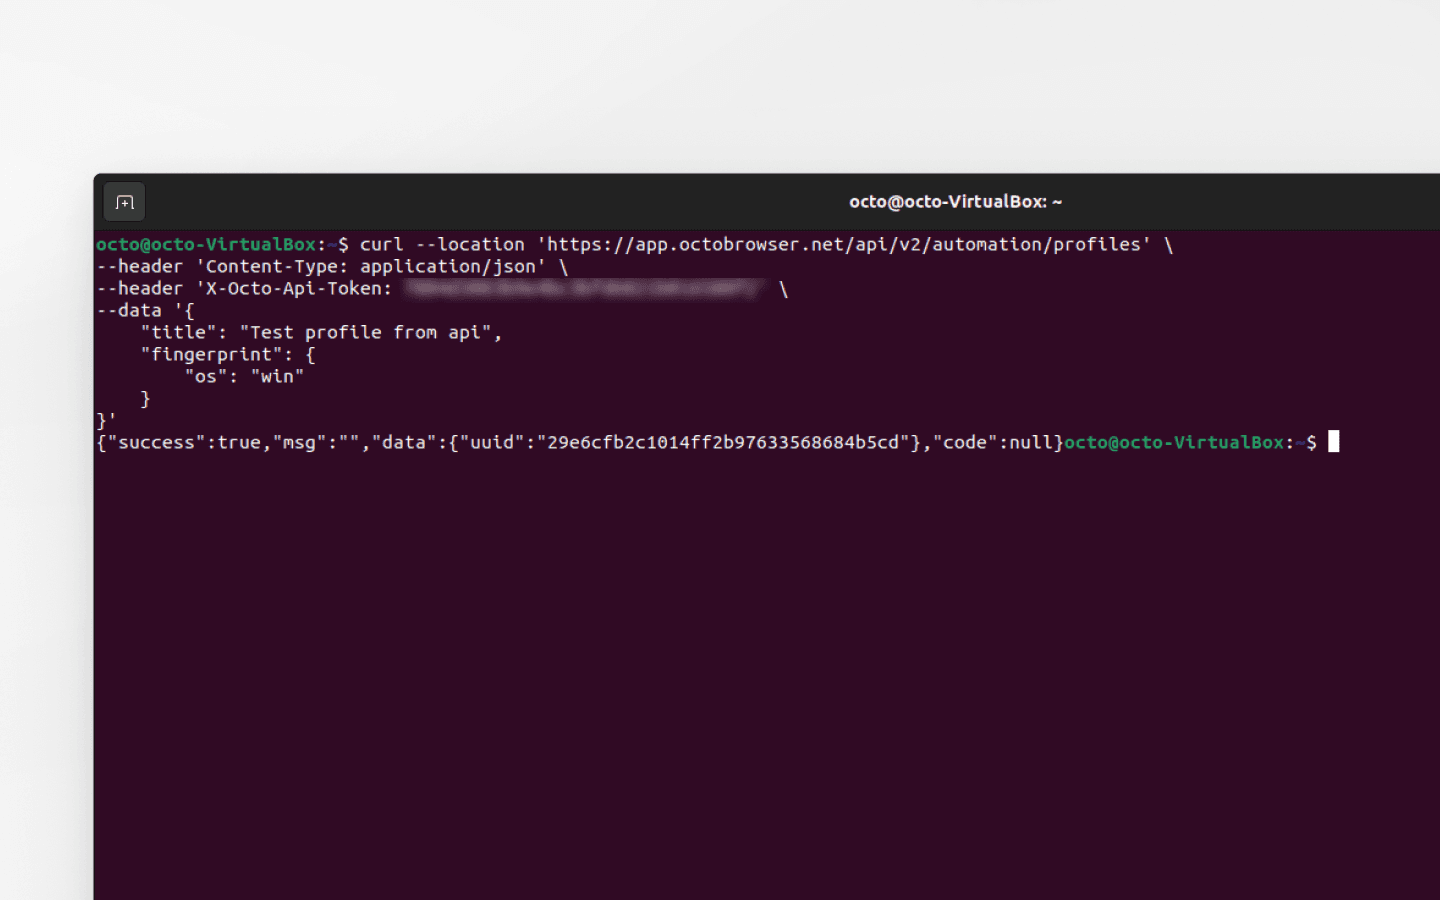
Let’s go through creating a profile using a POST request, Node.js, and the Axios library. Here is an example script:
const axios = require('axios');
const data = JSON.stringify({
  "title": "Test profile from api",
  "fingerprint": {
    "os": "win"
  }
});
const config = {
  method: 'post',
maxBodyLength: Infinity,
  url: 'https://app.octobrowser.net/api/v2/automation/profiles',
  headers: {
    'Content-Type': 'application/json',
    'X-Octo-Api-Token': '<GET_TOKEN_IN_CLIENT>'
  },
  data : data
};
axios(config)
.then(function (response) {
  console.log(JSON.stringify(response.data));
})
.catch(function (error) {
  console.log(error);
});
URL: 'https://app.octobrowser.net/api/v2/automation/profiles' (the API endpoint used for working with profiles).
Method: 'post' (create a new profile).
Request body (data): a JSON object containing the required fields (profile name and OS).
Headers:
Content-Type': 'application/json' tells the server that the data is in JSON format.'X-Octo-Api-Token': '<GET_TOKEN_IN_CLIENT>'is a unique API token available in the master account settings for Base and higher subscriptions.
After you send the request, the server always returns an HTTP response that includes a status code — a three-digit number indicating the result of processing the request.
Server responses
Successful (2xx):
{"success":true,"msg":"","data":{"uuid":"<profile_uuid>"},"code":null}
{"success":true,"msg":"","data":{"uuid":"<profile_uuid>"},"code":null}
Errors (4xx и 5xx):
400 Bad Request — incorrect syntax or a required parameter is missing.
401 Unauthorized — an invalid or missing API token.
404 Not Found — the URL does not exist.
429 Too Many Requests — the request limit has been exceeded.
500 Internal Server Error — a server-side error.
The .catch block in the script helps handle these errors.
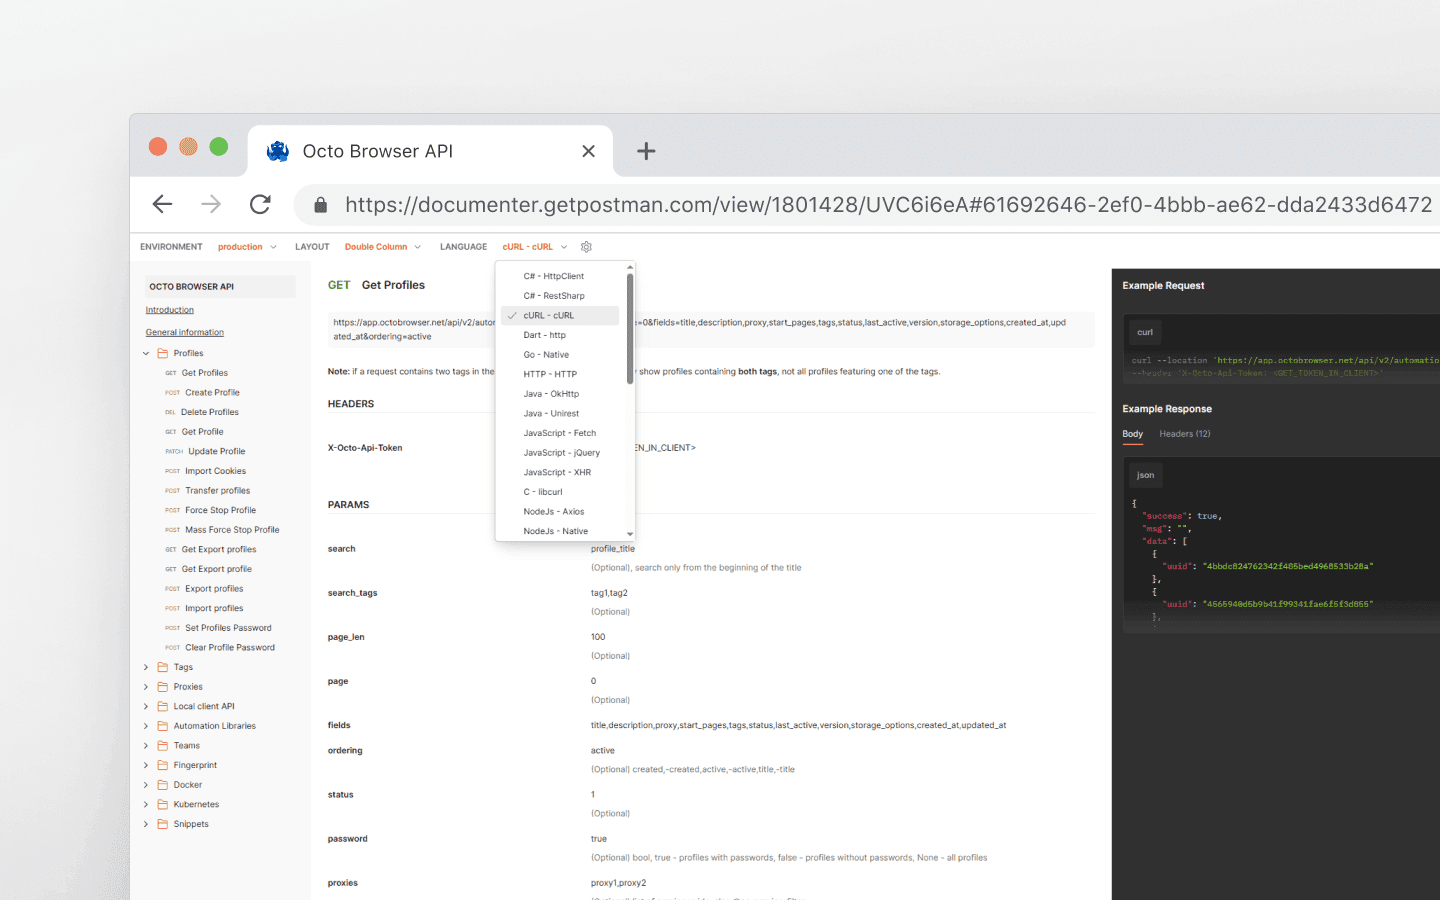
Octo Browser API documentation
The official Octo Browser API documentation includes request structures and usage examples:
The left menu lists sections such as Profiles, Proxies, Local Client API, Teams, and more.
The center contains request descriptions: the endpoint, method (GET, POST, etc.), parameters, headers, and usage examples.
The right side includes ready-made example requests and server responses.
The LANGUAGE dropdown lets you select examples in Node.js, Python, Java, C#, PHP, and other languages.
Working with the Public and Local API
Public API
A remote interface available online. It does not require the browser to be running.
Requests are sent to: https://app.octobrowser.net.
Limits depend on the subscription:
Subscription | RPM | RPH |
|---|---|---|
Base | 50 | 500 |
Team | 100 | 1 500 |
Advanced | 200+ | 3 000+ |
Using the Public API, you can:
retrieve profile information;
create, edit, and delete profiles;
work with tags, teams, and proxies.
Example request: creating a profile
POST https://app.octobrowser.net/api/v2/automation/profiles
Header: X-Octo-Api-Token: <YOUR_API_TOKEN>
Local API
Works locally when Octo Browser is running on the device.
Limits depend on the request type: Start Profile — 1 request, One-time Profile — 4 requests. All other Local API requests do not affect limits.
You can log in, start and stop profiles, and connect automation libraries.
Requests are sent to: http://localhost:58888 (58888 is the port of the local HTTP server).
Example request: starting a profile
POST http://localhost:58888/api/profiles/start
Header: Content-Type: application/json and a JSON body with the UUID and other parameters.
Solutions for sending requests
Postman
Download Postman or use the web version.
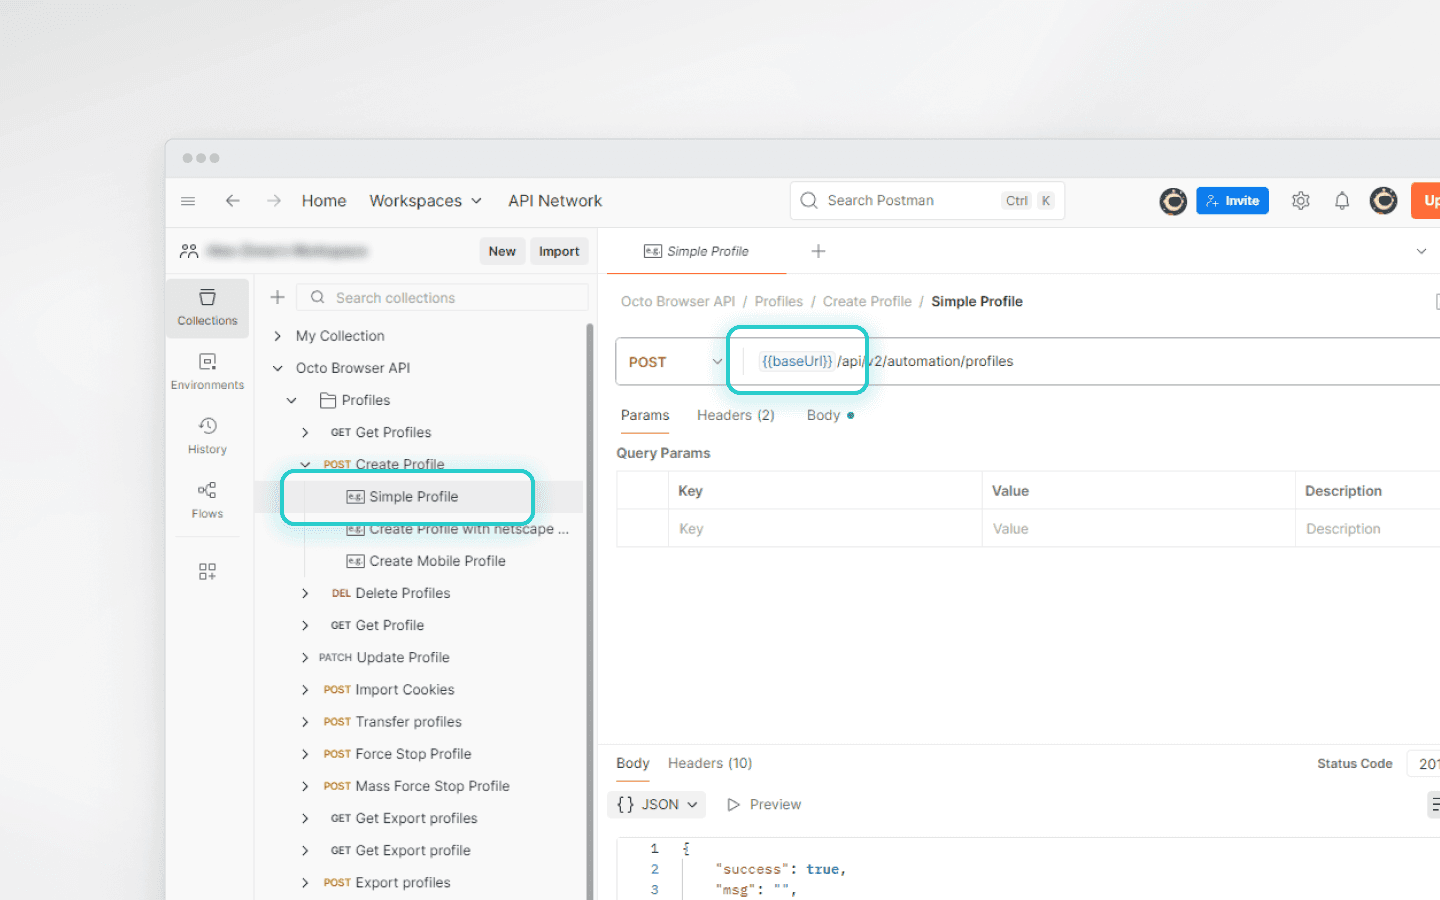
Import the Octo Browser API into your workspace using the Run in Postman button.
Choose a request (for example, POST Create Profile → Simple Profile).
Specify https://app.octobrowser.net instead of {{baseUrl}}.
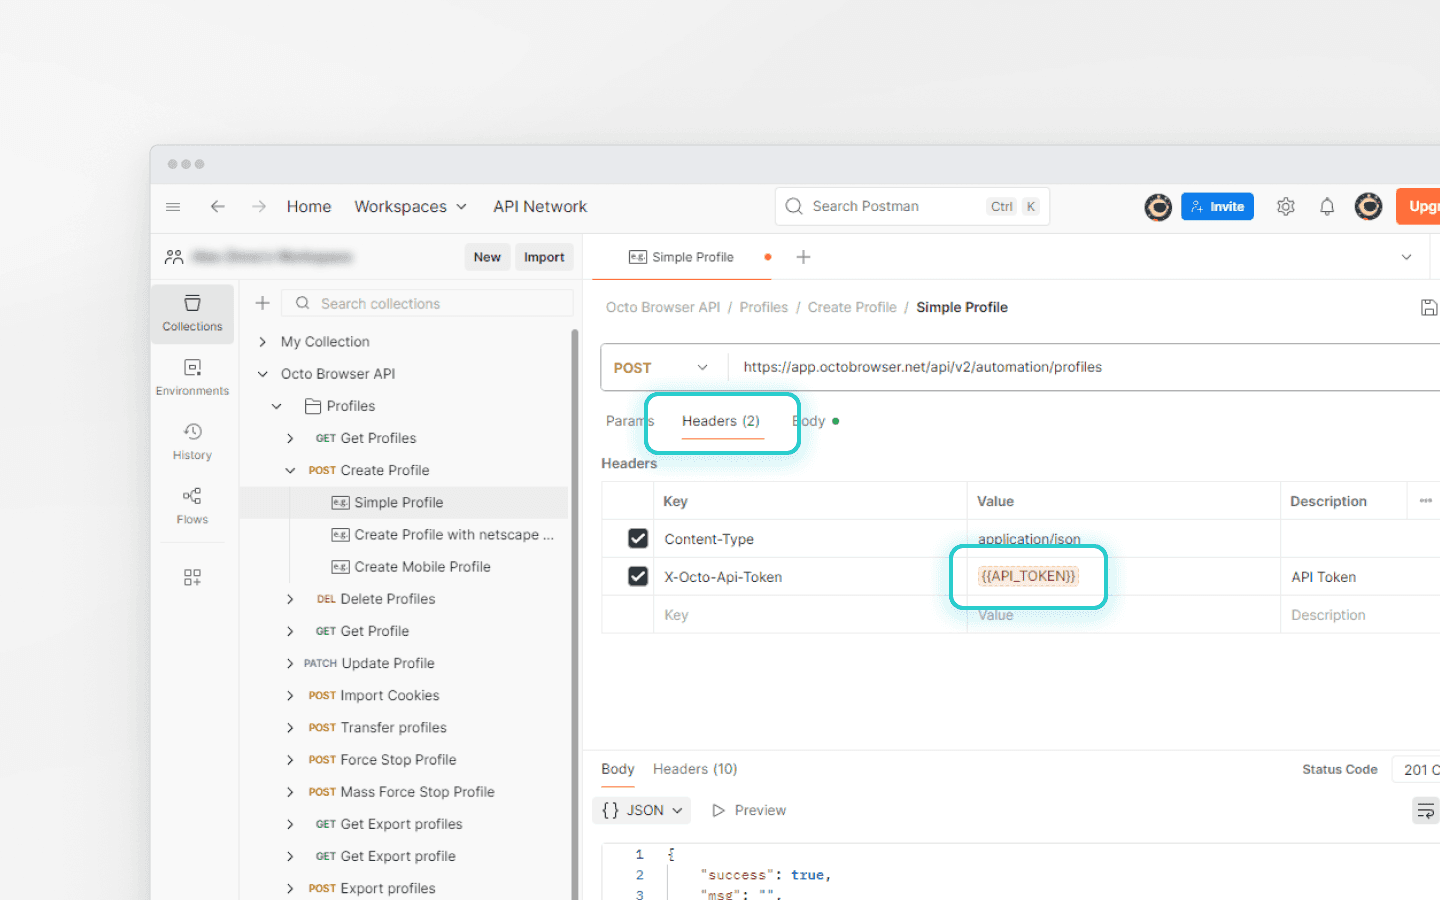
Set the API token in the Headers tab.
Enter the required profile parameters in the Body tab.
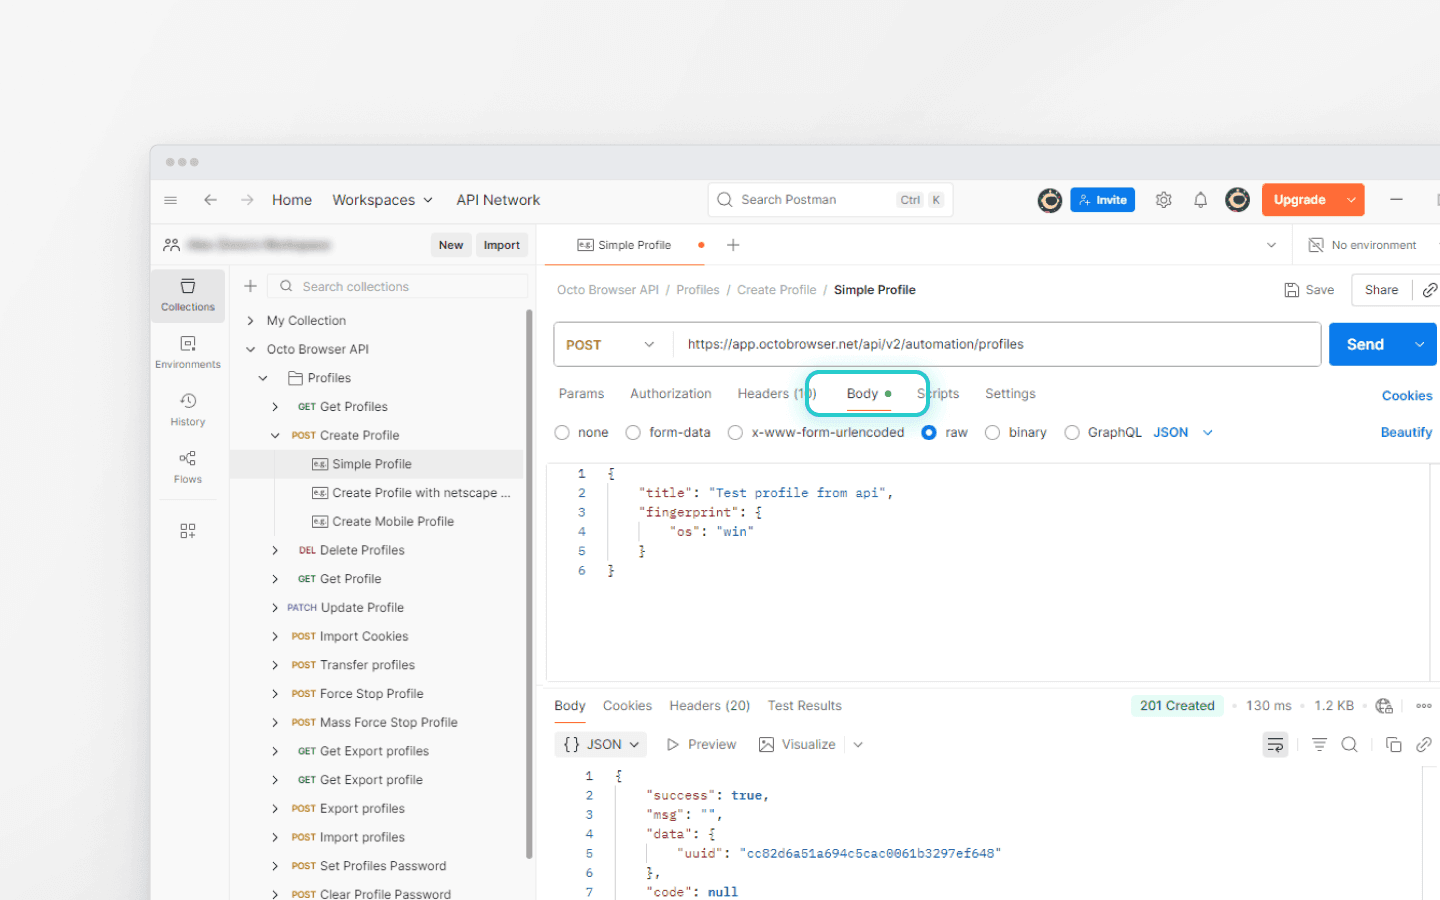
Click Send to create a profile.
The same applies to starting a profile:
Select the POST Start Profile request.
Specify the Local API URL: http://localhost:58888.
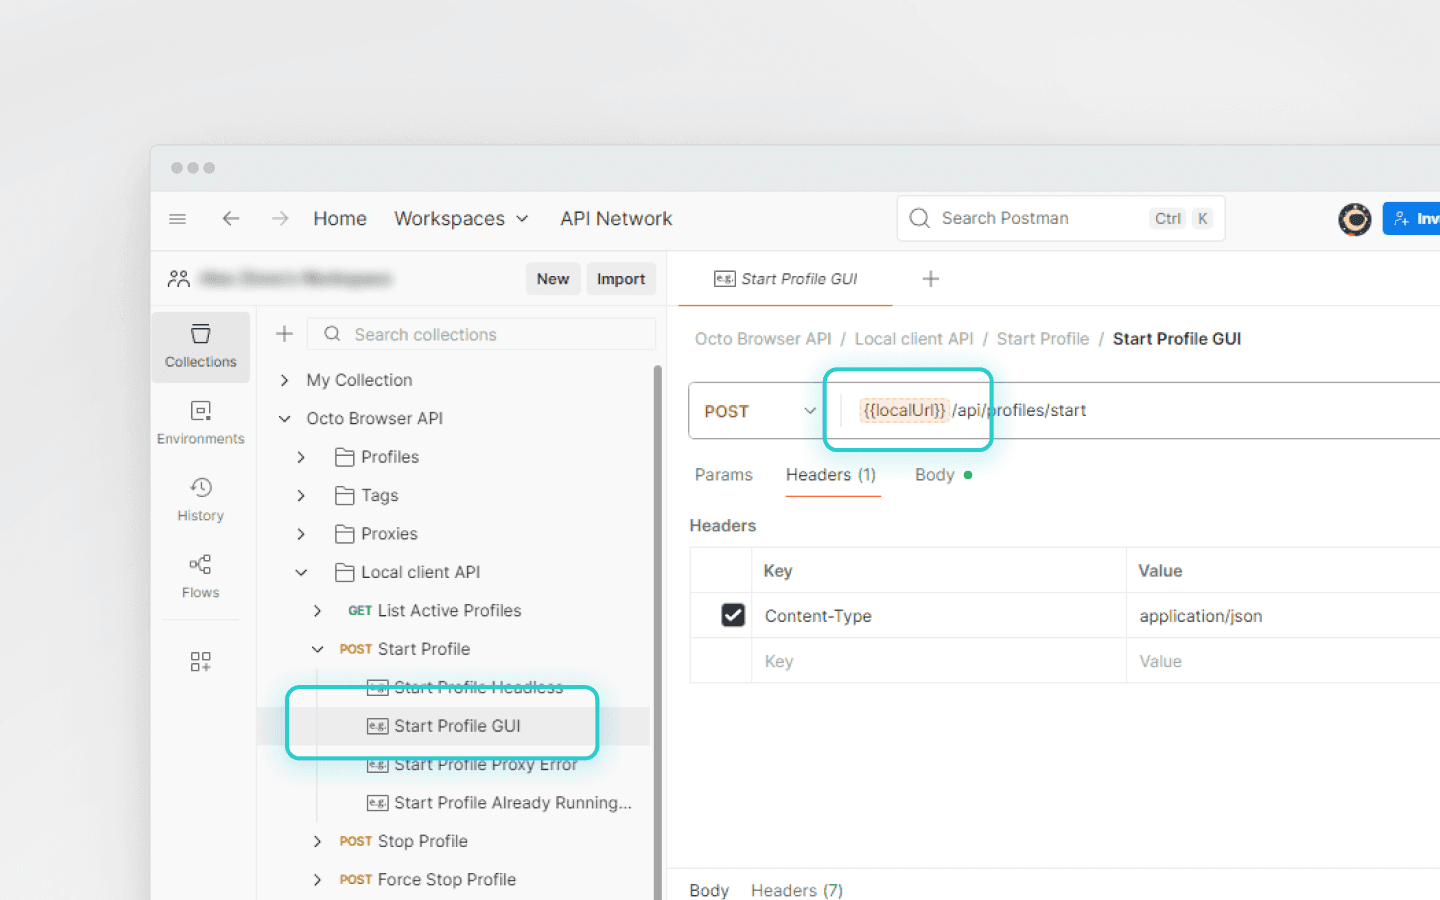
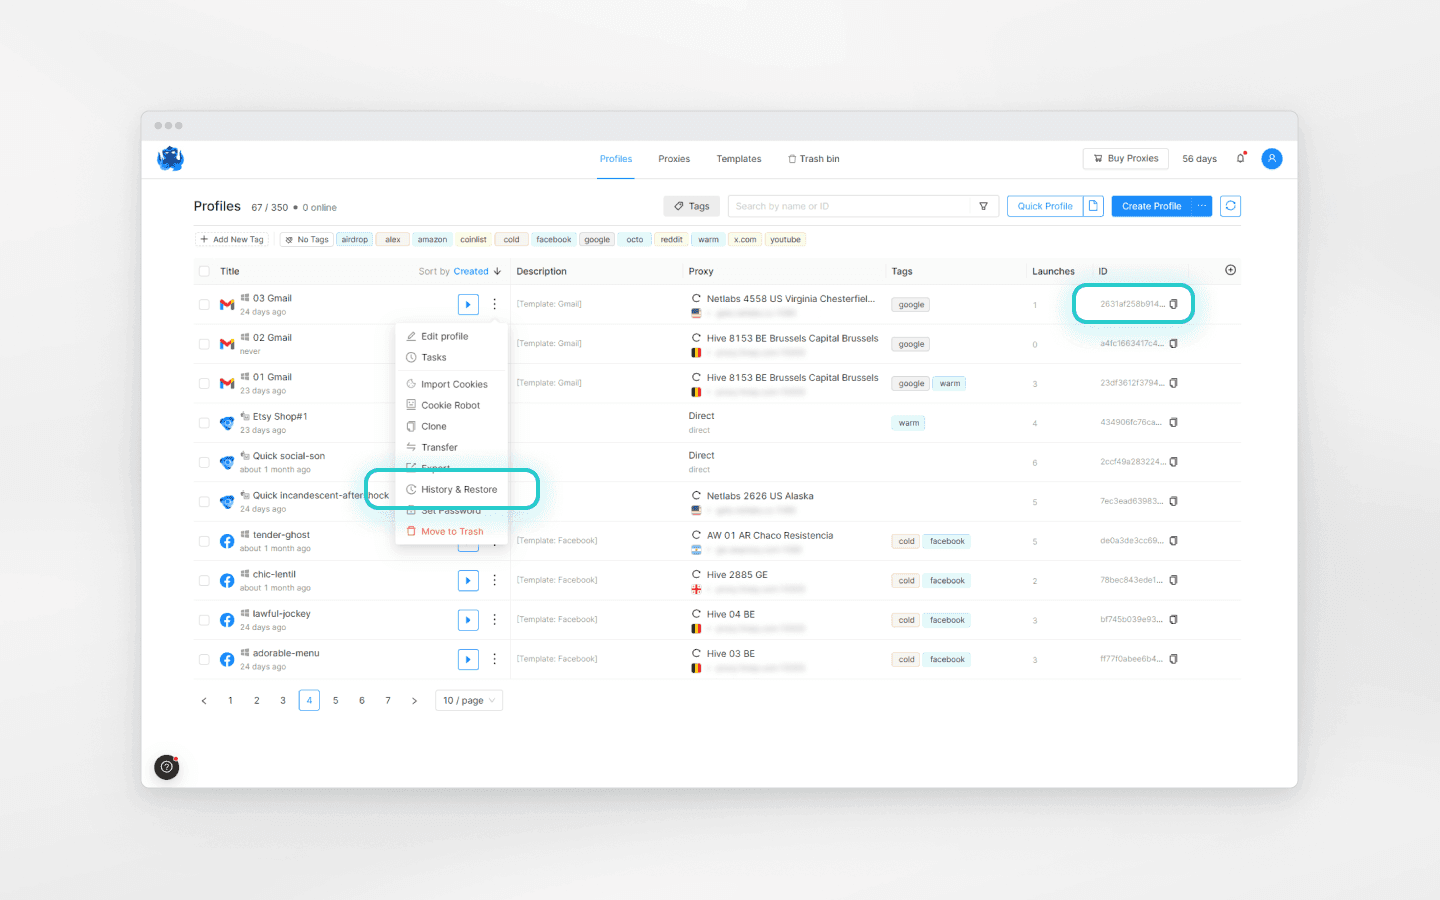
Find the profile UUID under “History and Restore,” in the profile table, or using the GET Get Profiles request.
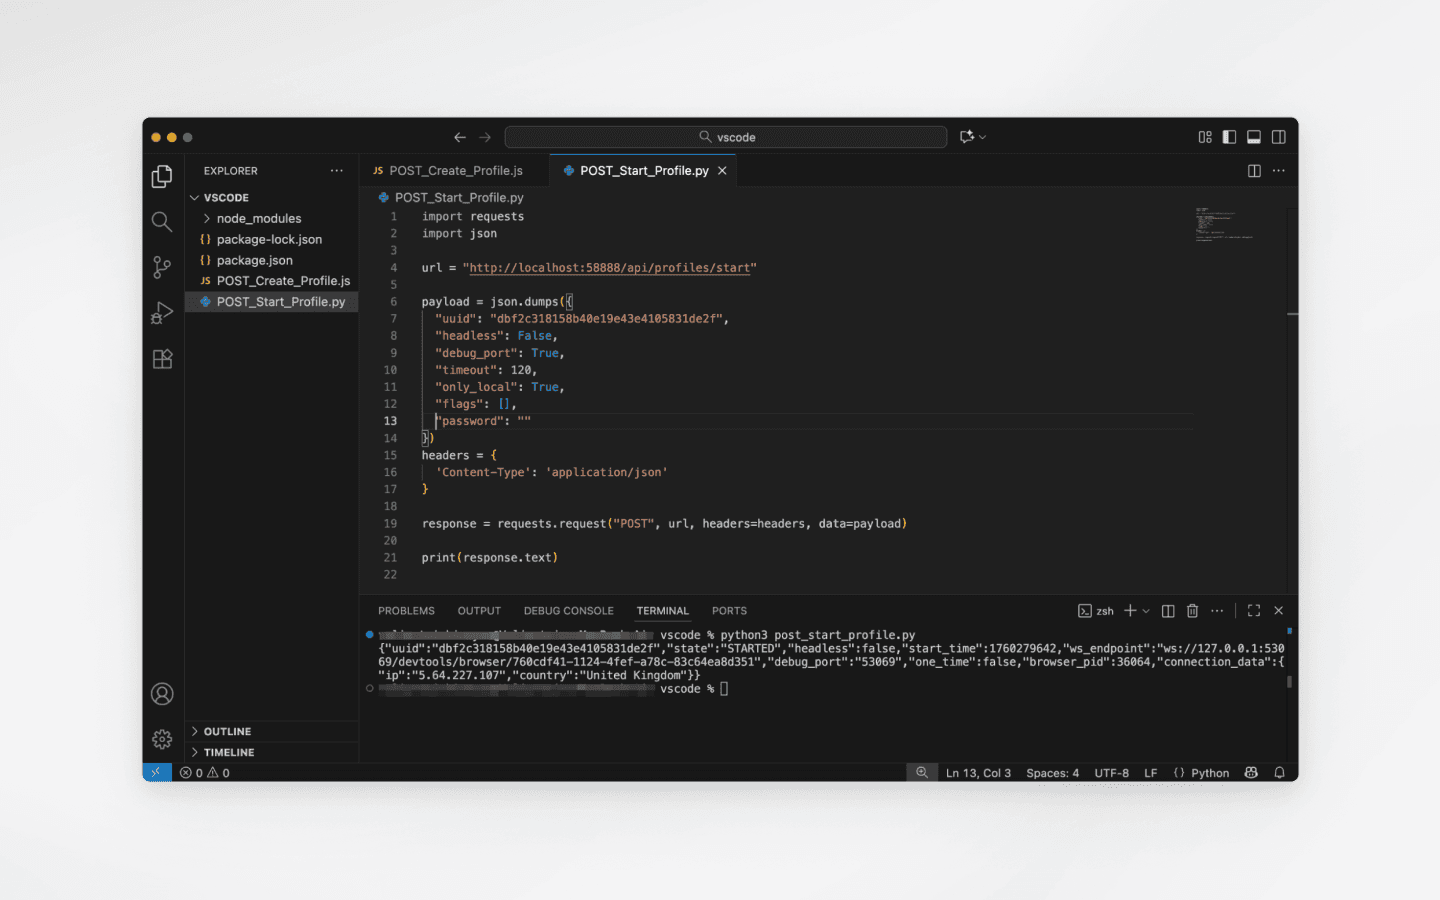
In the Body tab, set the parameters:
uuid: the profile ID;
headless: start without a GUI (true/false);
debug_port: enable the automation port (true/false or a specific port);
timeout: timeout in seconds;
only_local: restrict access to localhost (true/false);
flags: additional arguments (for example,
["--start-maximized"]);password: the profile password, if set.

Click Send and check the response.
VS Code
Download and install VS Code.
Download and install node.js for JavaScript.
Download and install Python for Python scripts.
Open VS Code and create a project folder.
Install dependencies:
For Node.js:
npm install axios.For Python:
pip install requests.
Copy the Octo documentation example for POST Create Profile using node.js + axios.
Create a .js file and paste the script into it.
Insert your API token and save the file.
Run the script with the command
node <filename>(for example,node post_create_profile)."
Similarly, to start a profile using Python, select POST Start Profile in Example Request, paste the script into a .py file, save it, and run it.
Terminal/CMD
You can also work with the API in Terminal/CMD. To do this, select cURL in the LANGUAGE menu.
Insert your API token into the POST Create Profile request and run:
Important: for CMD on Windows you need to adapt the syntax, since CMD interprets commands differently from Unix-like shells. In particular, quotation marks must be worked with correctly, and line breaks must be handled properly. Here is an adapted example of a profile start script:
curl --location "http://localhost:58888/api/profiles/start" ^
--header "Content-Type: application/json" ^
--data "{\"uuid\": \"42c4231d71f6495fb33e70d97915c696\", \"headless\": false, \"debug_port\": true, \"timeout\": 120, \"only_local\": true, \"flags\": [], \"password\": \"\"}"
curl --location "http://localhost:58888/api/profiles/start" ^
--header "Content-Type: application/json" ^
--data "{\"uuid\": \"42c4231d71f6495fb33e70d97915c696\", \"headless\": false, \"debug_port\": true, \"timeout\": 120, \"only_local\": true, \"flags\": [], \"password\": \"\"}"
*Insert the UUID of the required profile.
These are not all possible ways of working with the Octo Browser API — these are only some examples.
Automation frameworks and CDP
CDP (Chrome DevTools Protocol) allows you to control profile actions through code: open websites, click, type, and take screenshots.
Octo Browser supports CDP connections through the Local API. When you start a profile via POST Start Profile, you need to pass the debug_port parameter: true (or specify a port), and Octo will open a port for remote access (for example, ws://127.0.0.1:53215/devtools/browser/...).
Example of starting a profile with a CDP port:
curl --location 'http://localhost:58888/api/profiles/start' \
--header 'Content-Type: application/json' \
--data '{
    "uuid": "eb5d6441b2b349368b31fd901b82a8ac",
    "headless": false,
    "debug_port": true,
    "timeout": 120,
    "only_local": true
}'
curl --location 'http://localhost:58888/api/profiles/start' \
--header 'Content-Type: application/json' \
--data '{
    "uuid": "eb5d6441b2b349368b31fd901b82a8ac",
    "headless": false,
    "debug_port": true,
    "timeout": 120,
    "only_local": true
}'
The response will contain the connection address:
{"uuid":"eb5d6441b2b349368b31fd901b82a8ac","state":"STARTED","headless":false,"start_time":1761735064,"ws_endpoint":"ws://127.0.0.1:53215/devtools/browser/d633f197-1623-4f61-a9b0-28a65e0df2fd","debug_port":"53215","one_time":false,"browser_pid":57411,"connection_data":{"ip":"","country":""}}
{"uuid":"eb5d6441b2b349368b31fd901b82a8ac","state":"STARTED","headless":false,"start_time":1761735064,"ws_endpoint":"ws://127.0.0.1:53215/devtools/browser/d633f197-1623-4f61-a9b0-28a65e0df2fd","debug_port":"53215","one_time":false,"browser_pid":57411,"connection_data":{"ip":"","country":""}}
You can use this address in any library that supports CDP, for example, Puppeteer/Pyppeteer or Playwright. Detailed usage examples are available in the documentation.
Apart from direct CDP usage, you can connect Selenium to Octo Browser profiles through WebDriver. In this case, Selenium controls an already running browser via debug_port, but uses WebDriver instead of direct CDP commands. A connection example is available in the documentation.
Using automation libraries opens up wide possibilities, from warming up profiles and collecting cookies to building complex account registration logic and managing account actions.
How to run Octo Browser in Docker
Docker is software for automating the deployment and management of applications in containers. Each container has its own OS (usually Linux), libraries, dependencies, and settings. Unlike a virtual machine, a container is lightweight and starts very quickly.
Advantages of using Docker for Octo Browser:
Isolation: Octo Browser and its dependencies run independently, without conflicting with other applications.
Portability: the same container can run on a server, laptop, or VPS, and everything will work the same way.
Scalability: you can run many profiles at the same time, and create new containers when you need to handle more profiles in parallel.
Automation: convenient for scripts where the browser runs in headless mode without a graphical interface.
Running Docker:
1. Prepare a Dockerfile. An example Dockerfile for Ubuntu 22.04 with all dependencies, including Octo Browser and Google Chrome, is available in the documentation.
2. Build a Docker container:
docker build -t octobrowser:latest
docker build -t octobrowser:latest
3. Run the container:
docker run --name octo -it --rm \
       --security-opt seccomp:unconfined \
       -v '/srv/docker_octo/cache:/home/octo/.Octo Browser/' \
       -p 58895:58888 \
       octobrowser:latest
docker run --name octo -it --rm \
       --security-opt seccomp:unconfined \
       -v '/srv/docker_octo/cache:/home/octo/.Octo Browser/' \
       -p 58895:58888 \
       octobrowser:latest
How to manage Octo Browser containers using Kubernetes
Kubernetes (K8s) helps manage multiple containers at once.
Docker is meant for running a single container.
Kubernetes helps run a whole cluster of containers with automatic load distribution.
You can use Minikube, kind, Docker Desktop, or other tools to run Kubernetes.
Workflow for Octo Browser and Kubernetes:
Build the Docker container.
Run the container.
Use Kubernetes to manage the containers.
A Deployment YAML example is available in the documentation.
Useful scripts and snippets
In the Octo Browser API documentation, you will find not only basic methods but also ready-made scripts in Node.js and Python. The following scenarios are described in the documentation:
Mass profile creation — specify the number of profiles and your API token.
Mass addition of extensions, start pages, and bookmarks to selected profiles — specify the profile list, extensions, start pages, bookmarks, and API token.
Mass addition of extensions, start pages, and bookmarks to all profiles — specify extensions, start pages, bookmarks, and API token.
Mass addition of extensions, start pages, and bookmarks to profiles with a specific tag/tags — specify the tag/tags, extensions, start pages, bookmarks, and API token.
Mass proxy creation from a .txt file and subsequent profile creation using these proxies — the file must be in the format
protocol;host;port;login;password;title;change_ip_url(change_ip_urlis optional). Specify the API token and filename in the script.Add a saved proxy to a profile — specify the proxy, the profile, and the API token.
Copy all exported profiles from the browser’s export list to a specified folder — specify the folder and the API token.
Generate a .txt file containing the names of all profiles in your Octo Browser account — insert your API token.
API FAQ
How do I pass parameters when creating a profile using the API?
Example of a request body:
const body = {
  title: "profile_title", // required field
  fingerprint: {
    os: "mac", // required field: "mac", "win", or "android"
    os_arch: "arm", // optional field: you can set "x86" if you want to create a mac profile with an Intel processor
    os_version: "13" // optional field
    /*
      Possible values:
      — for Windows: 10, 11
      — for macOS (arm): 12, 13, 14, 15
      — for macOS (x86): 12, 13, 14, 15
      — for Android: 12, 13, 14, 15
    */
  }
};
The os field inside the fingerprint object is required. If you do not specify the other parameters, Octo Browser will automatically generate optimal values for them.
To see which other parameters can be passed when creating a profile:
Go to the Octo Browser API documentation (POST Create Profile request).
Scroll down to the Body section — it shows the structure of all available parameters.
After creating a profile, you can retrieve its parameters via the GET Get Profile request — the server response will contain the full profile structure.
How do one-time profiles work?
A one-time profile is a disposable profile that is created and immediately launched with a single API request, and automatically deleted after closing.
There is no need to send separate requests to create, launch, stop, and delete the profile. This can be useful, for example, for web scraping, where you only need to visit a web resource with a new browser fingerprint, collect data, and delete the profile afterwards.
One-time profiles are available in all subscriptions with API access.
A single POST One-time profile request counts as 4 requests toward your RPM/RPH limits.
To finish working with a one-time profile, you only need to send POST Stop Profile, close the browser window manually, or programmatically call a close action via Puppeteer, Playwright, or similar libraries — for example, using await browser.close(). After closing, the profile is deleted automatically and does not appear in your profile list or in the Trash.
What should I do if I exceed API limits (error 429)?
Stop your script and pause sending requests for some time. You can check your API limits in the response headers:
Retry-After: 0 # you can send the next request if the value is zero
X-Ratelimit-Limit: 200 # RPM indicating total requests per minute
X-Ratelimit-Limit-Hour: 3000 # RPH indicating total requests per hour
X-Ratelimit-Remaining: 4 # remaining RPM indicating requests left this minute
X-Ratelimit-Remaining-Hour: 2999 # remaining RPH indicating requests left this hour
X-Ratelimit-Reset: 1671789217 # UNIX timestamp indicating when the limits reset
Do not send requests when your limits are exhausted. Otherwise, the restriction period will increase, and stricter rate limits may be applied. Make sure your scripts check these limit headers before sending requests.
How do I get a ws_endpoint for CDP connections?
When you launch a profile via the API with the "debug_port": true parameter (or specify a specific port, for example "debug_port": 20000), Octo Browser returns a ws_endpoint value in the response.
This ws_endpoint is used by automation libraries (such as Puppeteer or Playwright) to connect to a running profile.
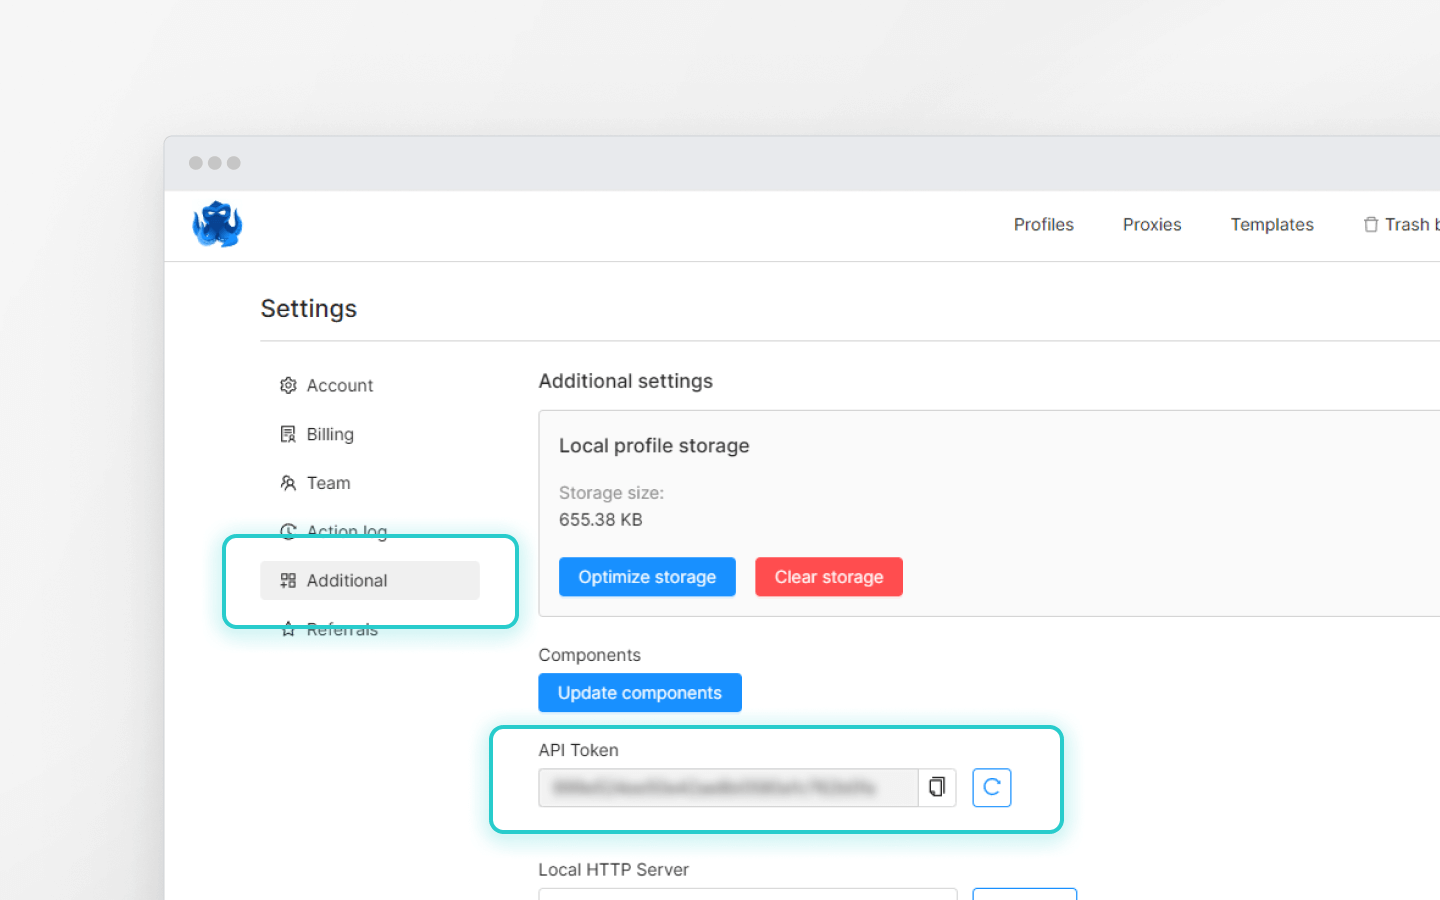
Where can I find my API token?
The API is available to users with the Base subscription and higher.
The API token is shown in the master account settings, under the “Additional” tab. Other team members cannot see the API token.
Manage any number of accounts without bans, routine, and unnecessary expenses.
Would you like to try Octo Browser at discount?
Use the promo code OCTOBLOG to get 30% off any subscription. This offer is valid only for new users.
What an API is
An API (Application Programming Interface) is a programming interface that allows software systems to communicate. Think of it like a restaurant: you place an order, the waiter takes it to the kitchen, and brings back the dish. The same happens when your application sends a request through the API and receives a response from the Octo Browser server.
HTTP requests
API communication happens through HTTP requests — messages a client sends to a server to request or transfer data.
Main HTTP methods
Method | Purpose | Example |
|---|---|---|
POST | Create new data | Create a new profile |
GET | Retrieve data | Get the full list of profiles in an Octo Browser account |
PATCH | Modify/update existing data | Change a profile name |
DELETE | Delete data (resource) | Delete a profile |
Request structure
Every request consists of several components:
URL: where the request is sent.
Method: what we want to do (GET, POST, etc.).
Headers: additional request information (for example, an API token).
Body: the data we send (for example, information for a new profile).
Let’s go through creating a profile using a POST request, Node.js, and the Axios library. Here is an example script:
const axios = require('axios');
const data = JSON.stringify({
  "title": "Test profile from api",
  "fingerprint": {
    "os": "win"
  }
});
const config = {
  method: 'post',
maxBodyLength: Infinity,
  url: 'https://app.octobrowser.net/api/v2/automation/profiles',
  headers: {
    'Content-Type': 'application/json',
    'X-Octo-Api-Token': '<GET_TOKEN_IN_CLIENT>'
  },
  data : data
};
axios(config)
.then(function (response) {
  console.log(JSON.stringify(response.data));
})
.catch(function (error) {
  console.log(error);
});
URL: 'https://app.octobrowser.net/api/v2/automation/profiles' (the API endpoint used for working with profiles).
Method: 'post' (create a new profile).
Request body (data): a JSON object containing the required fields (profile name and OS).
Headers:
Content-Type': 'application/json' tells the server that the data is in JSON format.'X-Octo-Api-Token': '<GET_TOKEN_IN_CLIENT>'is a unique API token available in the master account settings for Base and higher subscriptions.
After you send the request, the server always returns an HTTP response that includes a status code — a three-digit number indicating the result of processing the request.
Server responses
Successful (2xx):
{"success":true,"msg":"","data":{"uuid":"<profile_uuid>"},"code":null}
Errors (4xx и 5xx):
400 Bad Request — incorrect syntax or a required parameter is missing.
401 Unauthorized — an invalid or missing API token.
404 Not Found — the URL does not exist.
429 Too Many Requests — the request limit has been exceeded.
500 Internal Server Error — a server-side error.
The .catch block in the script helps handle these errors.
Octo Browser API documentation
The official Octo Browser API documentation includes request structures and usage examples:
The left menu lists sections such as Profiles, Proxies, Local Client API, Teams, and more.
The center contains request descriptions: the endpoint, method (GET, POST, etc.), parameters, headers, and usage examples.
The right side includes ready-made example requests and server responses.
The LANGUAGE dropdown lets you select examples in Node.js, Python, Java, C#, PHP, and other languages.
Working with the Public and Local API
Public API
A remote interface available online. It does not require the browser to be running.
Requests are sent to: https://app.octobrowser.net.
Limits depend on the subscription:
Subscription | RPM | RPH |
|---|---|---|
Base | 50 | 500 |
Team | 100 | 1 500 |
Advanced | 200+ | 3 000+ |
Using the Public API, you can:
retrieve profile information;
create, edit, and delete profiles;
work with tags, teams, and proxies.
Example request: creating a profile
POST https://app.octobrowser.net/api/v2/automation/profiles
Header: X-Octo-Api-Token: <YOUR_API_TOKEN>
Local API
Works locally when Octo Browser is running on the device.
Limits depend on the request type: Start Profile — 1 request, One-time Profile — 4 requests. All other Local API requests do not affect limits.
You can log in, start and stop profiles, and connect automation libraries.
Requests are sent to: http://localhost:58888 (58888 is the port of the local HTTP server).
Example request: starting a profile
POST http://localhost:58888/api/profiles/start
Header: Content-Type: application/json and a JSON body with the UUID and other parameters.
Solutions for sending requests
Postman
Download Postman or use the web version.
Import the Octo Browser API into your workspace using the Run in Postman button.
Choose a request (for example, POST Create Profile → Simple Profile).
Specify https://app.octobrowser.net instead of {{baseUrl}}.
Set the API token in the Headers tab.
Enter the required profile parameters in the Body tab.
Click Send to create a profile.
The same applies to starting a profile:
Select the POST Start Profile request.
Specify the Local API URL: http://localhost:58888.
Find the profile UUID under “History and Restore,” in the profile table, or using the GET Get Profiles request.
In the Body tab, set the parameters:
uuid: the profile ID;
headless: start without a GUI (true/false);
debug_port: enable the automation port (true/false or a specific port);
timeout: timeout in seconds;
only_local: restrict access to localhost (true/false);
flags: additional arguments (for example,
["--start-maximized"]);password: the profile password, if set.
Click Send and check the response.
VS Code
Download and install VS Code.
Download and install node.js for JavaScript.
Download and install Python for Python scripts.
Open VS Code and create a project folder.
Install dependencies:
For Node.js:
npm install axios.For Python:
pip install requests.
Copy the Octo documentation example for POST Create Profile using node.js + axios.
Create a .js file and paste the script into it.
Insert your API token and save the file.
Run the script with the command
node <filename>(for example,node post_create_profile)."
Similarly, to start a profile using Python, select POST Start Profile in Example Request, paste the script into a .py file, save it, and run it.
Terminal/CMD
You can also work with the API in Terminal/CMD. To do this, select cURL in the LANGUAGE menu.
Insert your API token into the POST Create Profile request and run:
Important: for CMD on Windows you need to adapt the syntax, since CMD interprets commands differently from Unix-like shells. In particular, quotation marks must be worked with correctly, and line breaks must be handled properly. Here is an adapted example of a profile start script:
curl --location "http://localhost:58888/api/profiles/start" ^
--header "Content-Type: application/json" ^
--data "{\"uuid\": \"42c4231d71f6495fb33e70d97915c696\", \"headless\": false, \"debug_port\": true, \"timeout\": 120, \"only_local\": true, \"flags\": [], \"password\": \"\"}"
*Insert the UUID of the required profile.
These are not all possible ways of working with the Octo Browser API — these are only some examples.
Automation frameworks and CDP
CDP (Chrome DevTools Protocol) allows you to control profile actions through code: open websites, click, type, and take screenshots.
Octo Browser supports CDP connections through the Local API. When you start a profile via POST Start Profile, you need to pass the debug_port parameter: true (or specify a port), and Octo will open a port for remote access (for example, ws://127.0.0.1:53215/devtools/browser/...).
Example of starting a profile with a CDP port:
curl --location 'http://localhost:58888/api/profiles/start' \
--header 'Content-Type: application/json' \
--data '{
    "uuid": "eb5d6441b2b349368b31fd901b82a8ac",
    "headless": false,
    "debug_port": true,
    "timeout": 120,
    "only_local": true
}'
The response will contain the connection address:
{"uuid":"eb5d6441b2b349368b31fd901b82a8ac","state":"STARTED","headless":false,"start_time":1761735064,"ws_endpoint":"ws://127.0.0.1:53215/devtools/browser/d633f197-1623-4f61-a9b0-28a65e0df2fd","debug_port":"53215","one_time":false,"browser_pid":57411,"connection_data":{"ip":"","country":""}}
You can use this address in any library that supports CDP, for example, Puppeteer/Pyppeteer or Playwright. Detailed usage examples are available in the documentation.
Apart from direct CDP usage, you can connect Selenium to Octo Browser profiles through WebDriver. In this case, Selenium controls an already running browser via debug_port, but uses WebDriver instead of direct CDP commands. A connection example is available in the documentation.
Using automation libraries opens up wide possibilities, from warming up profiles and collecting cookies to building complex account registration logic and managing account actions.
How to run Octo Browser in Docker
Docker is software for automating the deployment and management of applications in containers. Each container has its own OS (usually Linux), libraries, dependencies, and settings. Unlike a virtual machine, a container is lightweight and starts very quickly.
Advantages of using Docker for Octo Browser:
Isolation: Octo Browser and its dependencies run independently, without conflicting with other applications.
Portability: the same container can run on a server, laptop, or VPS, and everything will work the same way.
Scalability: you can run many profiles at the same time, and create new containers when you need to handle more profiles in parallel.
Automation: convenient for scripts where the browser runs in headless mode without a graphical interface.
Running Docker:
1. Prepare a Dockerfile. An example Dockerfile for Ubuntu 22.04 with all dependencies, including Octo Browser and Google Chrome, is available in the documentation.
2. Build a Docker container:
docker build -t octobrowser:latest
3. Run the container:
docker run --name octo -it --rm \
       --security-opt seccomp:unconfined \
       -v '/srv/docker_octo/cache:/home/octo/.Octo Browser/' \
       -p 58895:58888 \
       octobrowser:latest
How to manage Octo Browser containers using Kubernetes
Kubernetes (K8s) helps manage multiple containers at once.
Docker is meant for running a single container.
Kubernetes helps run a whole cluster of containers with automatic load distribution.
You can use Minikube, kind, Docker Desktop, or other tools to run Kubernetes.
Workflow for Octo Browser and Kubernetes:
Build the Docker container.
Run the container.
Use Kubernetes to manage the containers.
A Deployment YAML example is available in the documentation.
Useful scripts and snippets
In the Octo Browser API documentation, you will find not only basic methods but also ready-made scripts in Node.js and Python. The following scenarios are described in the documentation:
Mass profile creation — specify the number of profiles and your API token.
Mass addition of extensions, start pages, and bookmarks to selected profiles — specify the profile list, extensions, start pages, bookmarks, and API token.
Mass addition of extensions, start pages, and bookmarks to all profiles — specify extensions, start pages, bookmarks, and API token.
Mass addition of extensions, start pages, and bookmarks to profiles with a specific tag/tags — specify the tag/tags, extensions, start pages, bookmarks, and API token.
Mass proxy creation from a .txt file and subsequent profile creation using these proxies — the file must be in the format
protocol;host;port;login;password;title;change_ip_url(change_ip_urlis optional). Specify the API token and filename in the script.Add a saved proxy to a profile — specify the proxy, the profile, and the API token.
Copy all exported profiles from the browser’s export list to a specified folder — specify the folder and the API token.
Generate a .txt file containing the names of all profiles in your Octo Browser account — insert your API token.
API FAQ
How do I pass parameters when creating a profile using the API?
Example of a request body:
const body = {
  title: "profile_title", // required field
  fingerprint: {
    os: "mac", // required field: "mac", "win", or "android"
    os_arch: "arm", // optional field: you can set "x86" if you want to create a mac profile with an Intel processor
    os_version: "13" // optional field
    /*
      Possible values:
      — for Windows: 10, 11
      — for macOS (arm): 12, 13, 14, 15
      — for macOS (x86): 12, 13, 14, 15
      — for Android: 12, 13, 14, 15
    */
  }
};
The os field inside the fingerprint object is required. If you do not specify the other parameters, Octo Browser will automatically generate optimal values for them.
To see which other parameters can be passed when creating a profile:
Go to the Octo Browser API documentation (POST Create Profile request).
Scroll down to the Body section — it shows the structure of all available parameters.
After creating a profile, you can retrieve its parameters via the GET Get Profile request — the server response will contain the full profile structure.
How do one-time profiles work?
A one-time profile is a disposable profile that is created and immediately launched with a single API request, and automatically deleted after closing.
There is no need to send separate requests to create, launch, stop, and delete the profile. This can be useful, for example, for web scraping, where you only need to visit a web resource with a new browser fingerprint, collect data, and delete the profile afterwards.
One-time profiles are available in all subscriptions with API access.
A single POST One-time profile request counts as 4 requests toward your RPM/RPH limits.
To finish working with a one-time profile, you only need to send POST Stop Profile, close the browser window manually, or programmatically call a close action via Puppeteer, Playwright, or similar libraries — for example, using await browser.close(). After closing, the profile is deleted automatically and does not appear in your profile list or in the Trash.
What should I do if I exceed API limits (error 429)?
Stop your script and pause sending requests for some time. You can check your API limits in the response headers:
Retry-After: 0 # you can send the next request if the value is zero
X-Ratelimit-Limit: 200 # RPM indicating total requests per minute
X-Ratelimit-Limit-Hour: 3000 # RPH indicating total requests per hour
X-Ratelimit-Remaining: 4 # remaining RPM indicating requests left this minute
X-Ratelimit-Remaining-Hour: 2999 # remaining RPH indicating requests left this hour
X-Ratelimit-Reset: 1671789217 # UNIX timestamp indicating when the limits reset
Do not send requests when your limits are exhausted. Otherwise, the restriction period will increase, and stricter rate limits may be applied. Make sure your scripts check these limit headers before sending requests.
How do I get a ws_endpoint for CDP connections?
When you launch a profile via the API with the "debug_port": true parameter (or specify a specific port, for example "debug_port": 20000), Octo Browser returns a ws_endpoint value in the response.
This ws_endpoint is used by automation libraries (such as Puppeteer or Playwright) to connect to a running profile.
Where can I find my API token?
The API is available to users with the Base subscription and higher.
The API token is shown in the master account settings, under the “Additional” tab. Other team members cannot see the API token.
Stay up to date with the latest Octo Browser news
By clicking the button you agree to our Privacy Policy.
Stay up to date with the latest Octo Browser news
By clicking the button you agree to our Privacy Policy.
Stay up to date with the latest Octo Browser news
By clicking the button you agree to our Privacy Policy.

Join Octo Browser now
Or contact Customer Service at any time with any questions you might have.
Join Octo Browser now
Or contact Customer Service at any time with any questions you might have.
Join Octo Browser now
Or contact Customer Service at any time with any questions you might have.