How to get a WireGuard configuration file for Octo Browser: instructions for Mullvad and Proton VPN

Sophia Grote
Support specialist, Octo Browser
Octo Browser lets you connect a VPN separately to each profile. To do this, Octo supports WireGuard and AmneziaWG configurations: you can upload a ready-made .conf file in the connection settings or paste its contents as text.
Previously, we looked at how a VPN differs from a proxy, how the traffic route changes, and how to check that a VPN is working as a full-fledged tunnel.
In this article, we'll show you where to get a WireGuard configuration from a VPN provider. We'll use two services as examples: Mullvad and Proton VPN.
Octo Browser lets you connect a VPN separately to each profile. To do this, Octo supports WireGuard and AmneziaWG configurations: you can upload a ready-made .conf file in the connection settings or paste its contents as text.
Previously, we looked at how a VPN differs from a proxy, how the traffic route changes, and how to check that a VPN is working as a full-fledged tunnel.
In this article, we'll show you where to get a WireGuard configuration from a VPN provider. We'll use two services as examples: Mullvad and Proton VPN.
Contents
Maintain your online anonymity with Octo Browser. Your real digital fingerprint cannot be tracked.
What is a configuration file
To connect WireGuard VPN to an Octo Browser profile, you need a file with the .conf extension containing:
WireGuard interface parameters;
a private key;
the VPN server address;
the server's public key;
routing and DNS settings.
This file is generated by the VPN provider. You can then import it into Octo Browser.
Important: A WireGuard configuration contains a private key. Treat the .conf file like a password for your VPN connection: don't publish it or post it in public chats.
How to get a WireGuard configuration in Mullvad
1. Sign into your account and open WireGuard configuration
Open mullvad.net and sign into your account. Mullvad doesn't use a username, password, or email address—you only need your 16-digit account number to sign in.
After signing in, the Account page will open. In the left-hand menu, find Downloads and select WireGuard configuration.
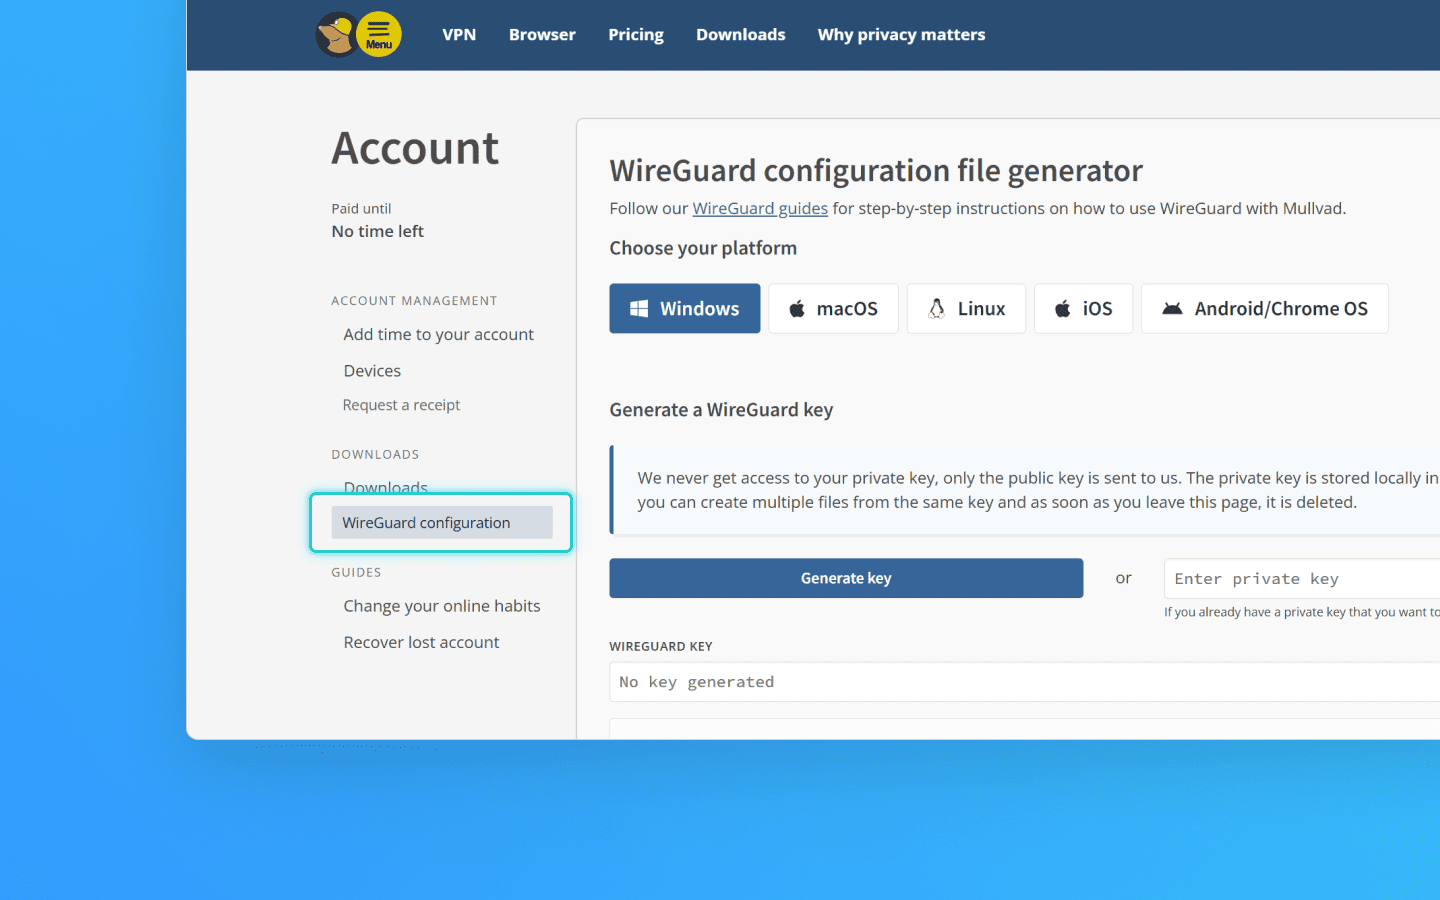
WireGuard configuration in the left-hand menu under Downloads
2. Generate a new key or import an existing one
On the WireGuard configuration file generator page, you'll need a WireGuard key. You have two options here:
Generate key: generate a new key pair directly in the browser.
Import key: paste an existing private key into the Enter private key field and click Import key. This lets you reuse a previously created key without using up the limit.
The limit is 5 keys per account. If the Generate key button is inactive and the red message You can only have 5 keys appears above it, expand the Manage WireGuard keys section at the bottom of the page and delete one of the keys using the trash icon.
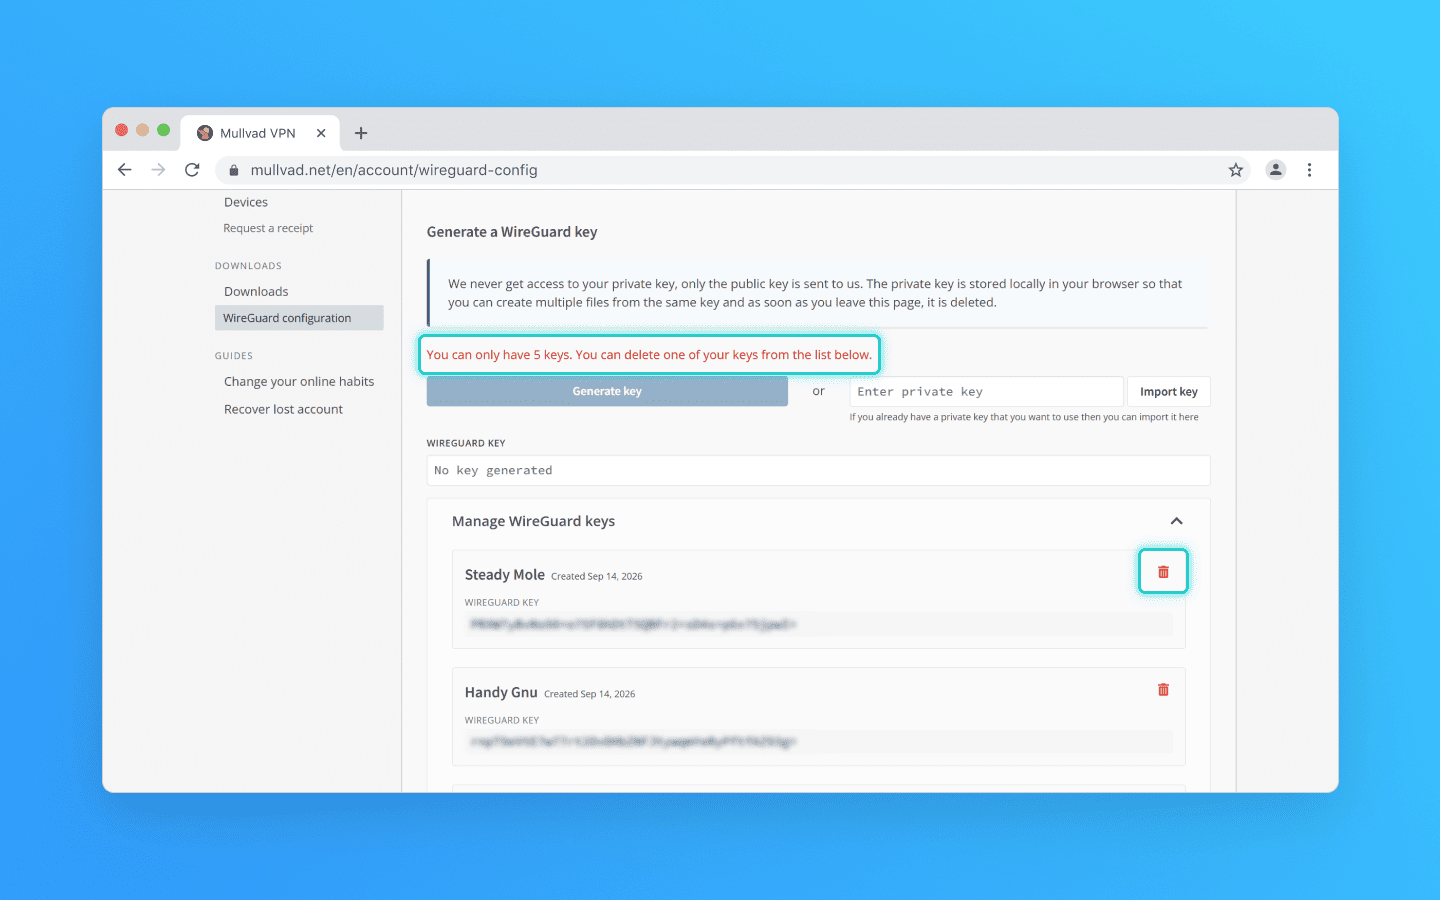
Generate a WireGuard key: the Generate key button is disabled because the 5-key limit has been reached. Manage WireGuard keys: key name, creation date, and the trash icon for deleting a key
Important: After you delete a key, all configurations created with it will stop working. To avoid deleting a key that is still in use, check its name and date in the Created field.
3. Choose a country and city
In the Select one or multiple exit locations section, specify which servers your traffic should go through:
All countries: choose a country; you can select multiple countries.
All cities: choose a city; this field becomes active after you select a country.
All servers: choose specific servers within a city.
If you leave the default settings (All…), configurations will be created for the entire Mullvad network, and the archive will contain hundreds of files. It's therefore better to narrow your selection down to the country and city you need.
Advanced settings is an optional section containing additional connection parameters.
Under Configure Content Blocking, you can enable DNS-level blocking for specific categories: Ads, Trackers, Malware, Adult content, Gambling, and Social Media. The selected settings are saved in the configuration as a DNS server address. To change them later, you'll need to create the file again. If you don't need these settings, select None.
4. Download the generated configuration
Click Download zip archive. The archive will contain one .conf file for each selected server.
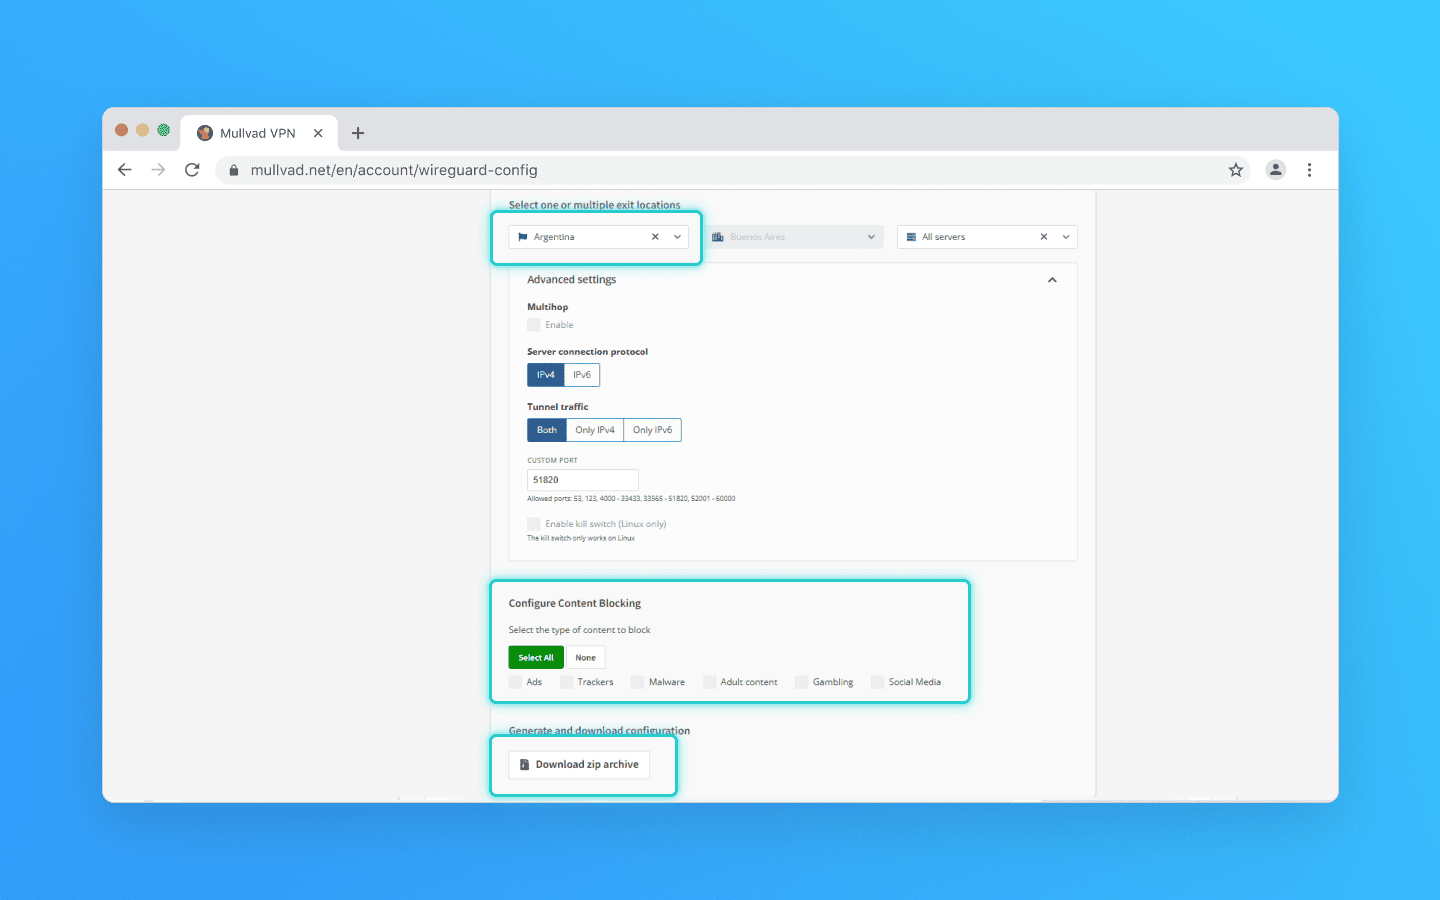
Location selection, content blocking, and the Download zip archive button
Extract the archive. Inside, you'll find ready-made .conf files—one for each selected server.
How to get a WireGuard configuration in Proton VPN
1. Sign into Proton and select VPN
Sign into your account at account.proton.me.
After signing in, the Welcome screen will open with a list of Proton services: Mail, Calendar, Pass, VPN, Drive, and others. Select VPN.
If this screen doesn't appear and you are taken directly to another service, you can switch to VPN from the service selection screen.
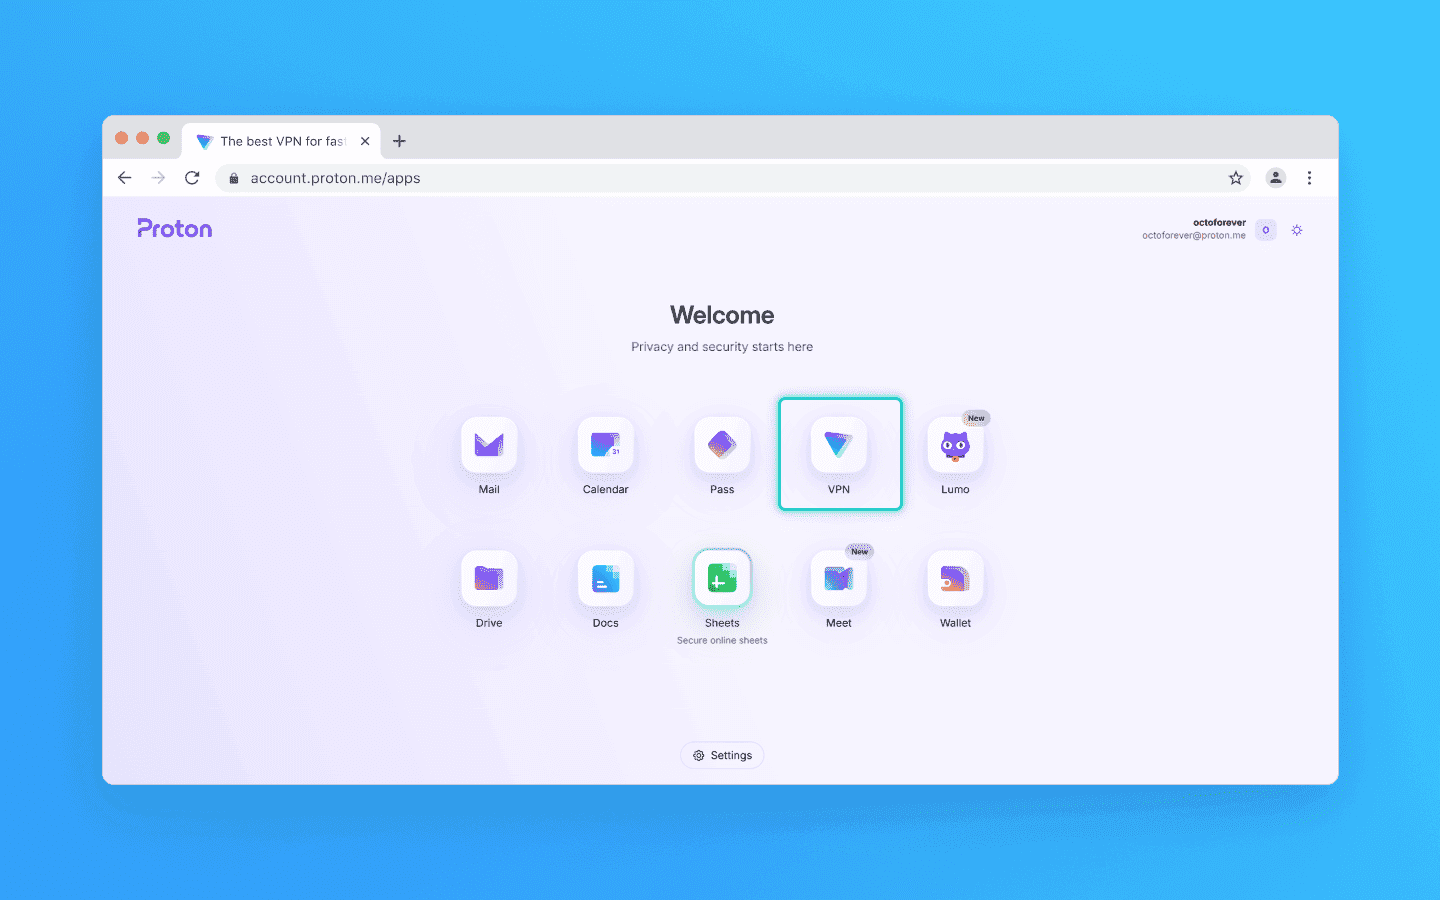
The Proton service selection screen. Select VPN
2. Open Proton VPN → WireGuard
In the left-hand menu, find WireGuard under Proton VPN. You will also see VPN apps, which contain ready-made apps, and OpenVPN, which contains configurations for another protocol.
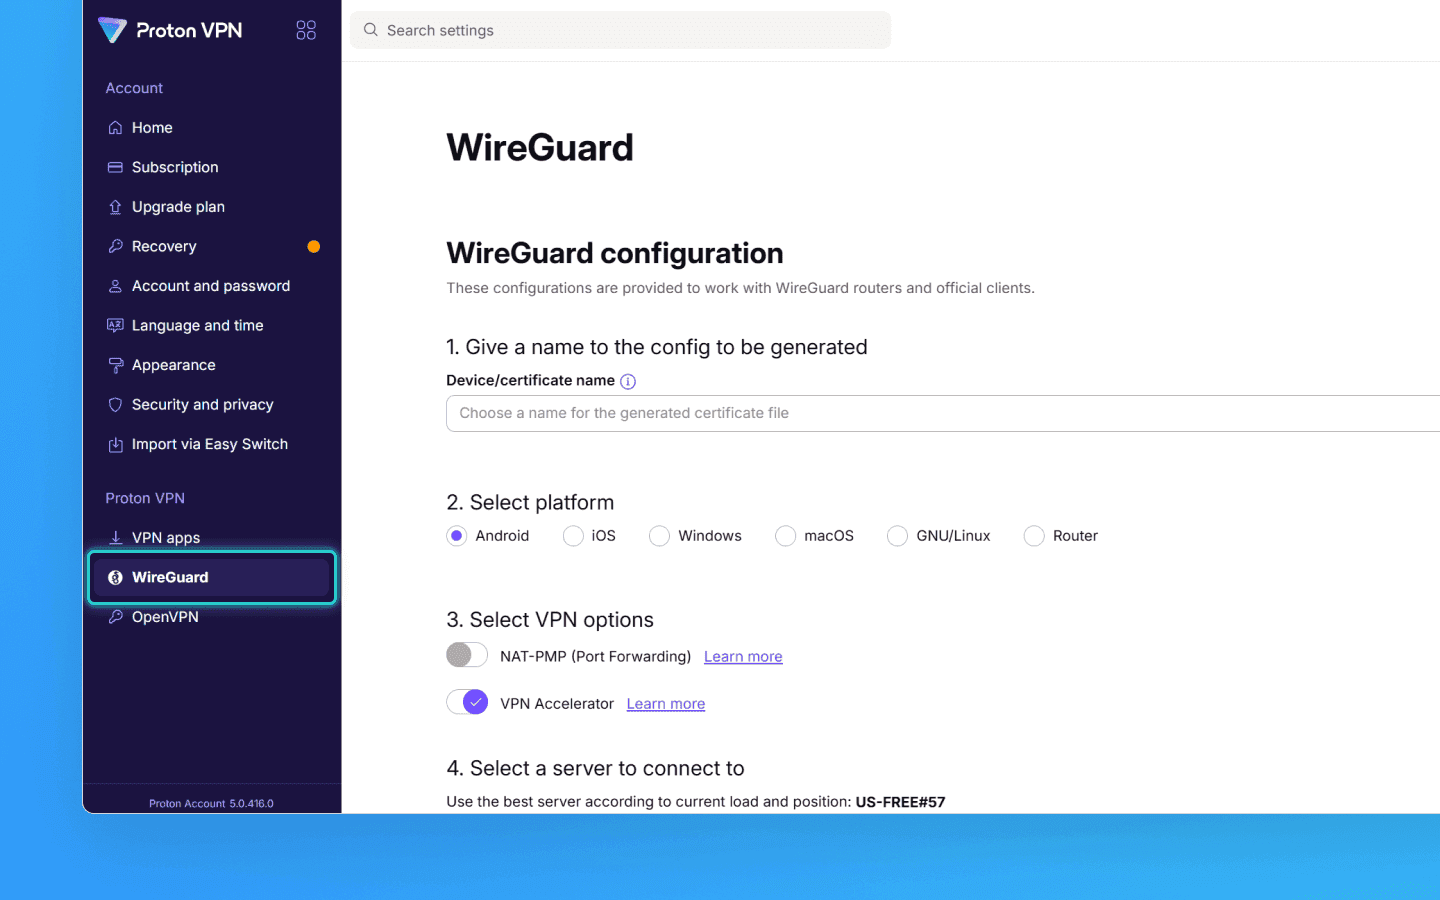
The Proton VPN section in the sidebar, with WireGuard inside it
3. Select a server
Scroll down to the list of countries. They are arranged alphabetically, with the number of cities shown next to each country.
Expand the country you need using the arrow on the left to open the server table.
The table contains:
Name: the server name, for example
AT#127.City: the city where the server is located.
Status: the server's current load as a percentage: the lower the value, the more available capacity there is.
Icons next to Status: additional server features, such as P2P or IPv6 support. To see what an icon means, hover over it.
In the row for the server you need, click Create. If you need configurations for multiple servers, repeat this step for each one, and a separate configuration will be created for each server.
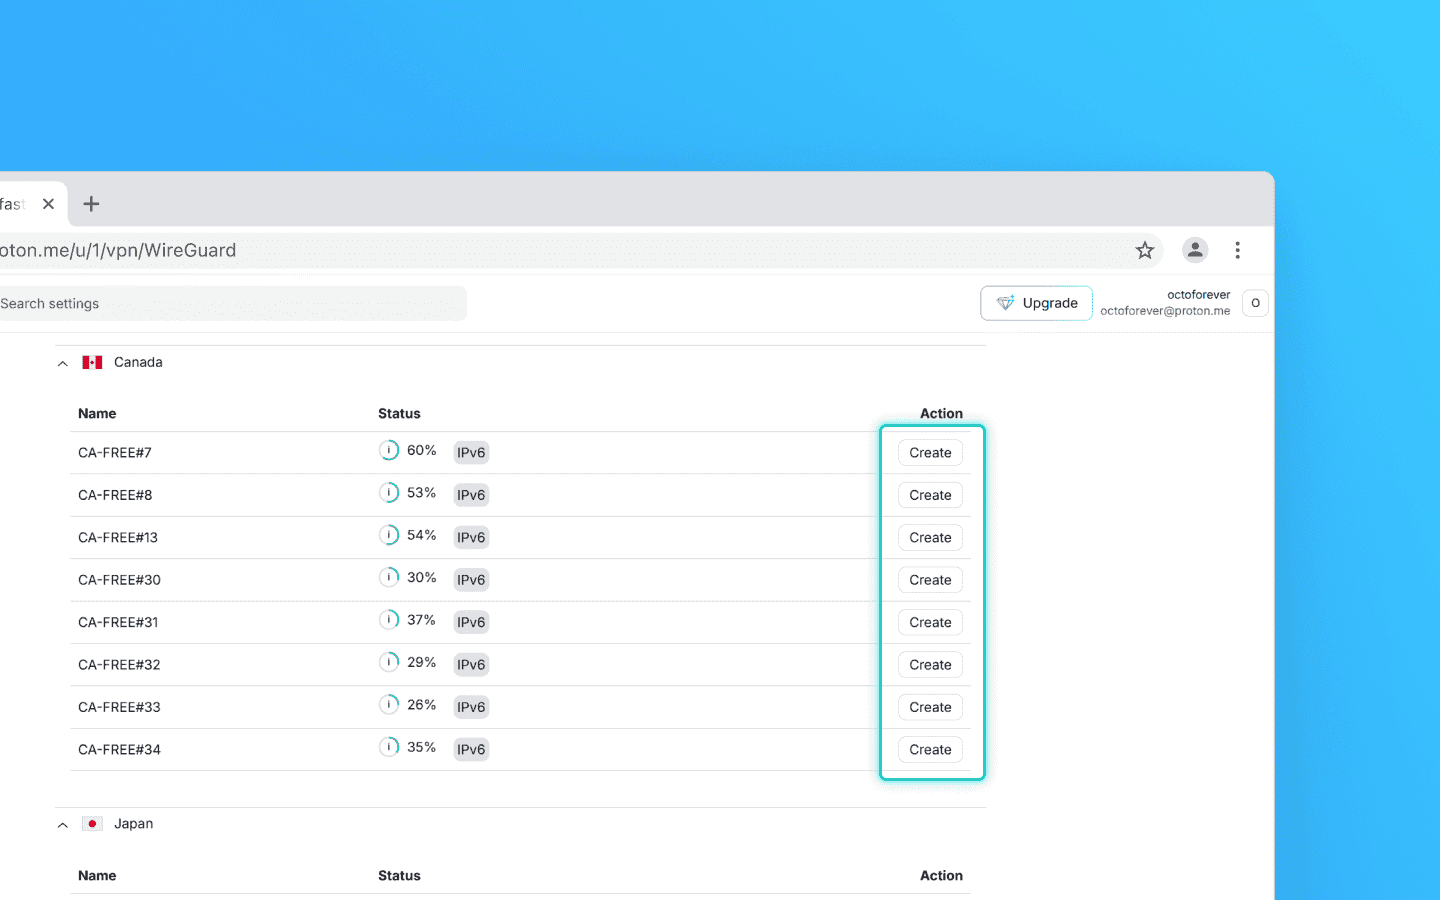
The server table for a country. The configuration file is created by clicking Create in the required row
4. Download the generated configuration
After you click Create, a window will open with the server name in the title.
The Text tab contains the configuration itself—you can select and copy it. To save it as a file, click Download. The .conf file will be saved to your device.
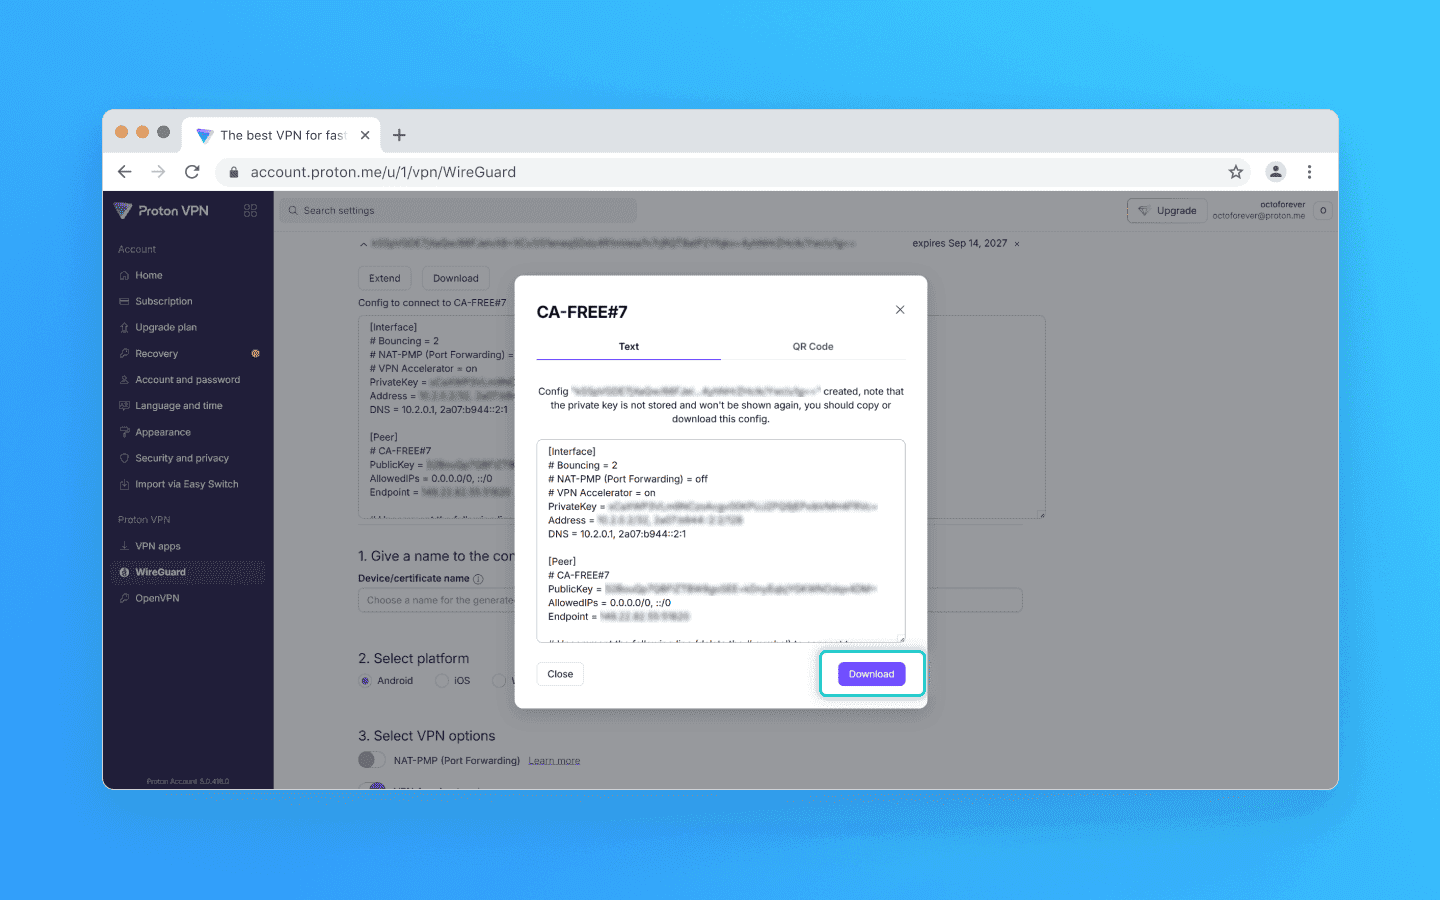
The generated configuration window. The Download button is in the bottom-right corner
Proton displays the private key only once. Copy or download the configuration before closing the window. Otherwise, you'll have to create a new one using the Create button.
The downloaded .conf file is a ready-to-use WireGuard configuration for the selected server.
It contains the private key in plain text, so it effectively acts as the password for the connection. Don't post such files in public chats or store them in publicly accessible locations.
How to add the configuration to Octo Browser
After downloading the .conf file, the remaining steps are the same for any VPN provider.
Open the settings of the required Octo Browser profile.
Click Add a new proxy / VPN under Proxy / VPN.
Select the VPN tab.
Upload the
.conffile you obtained or paste the configuration as text.Save the connection and assign it to the profile.
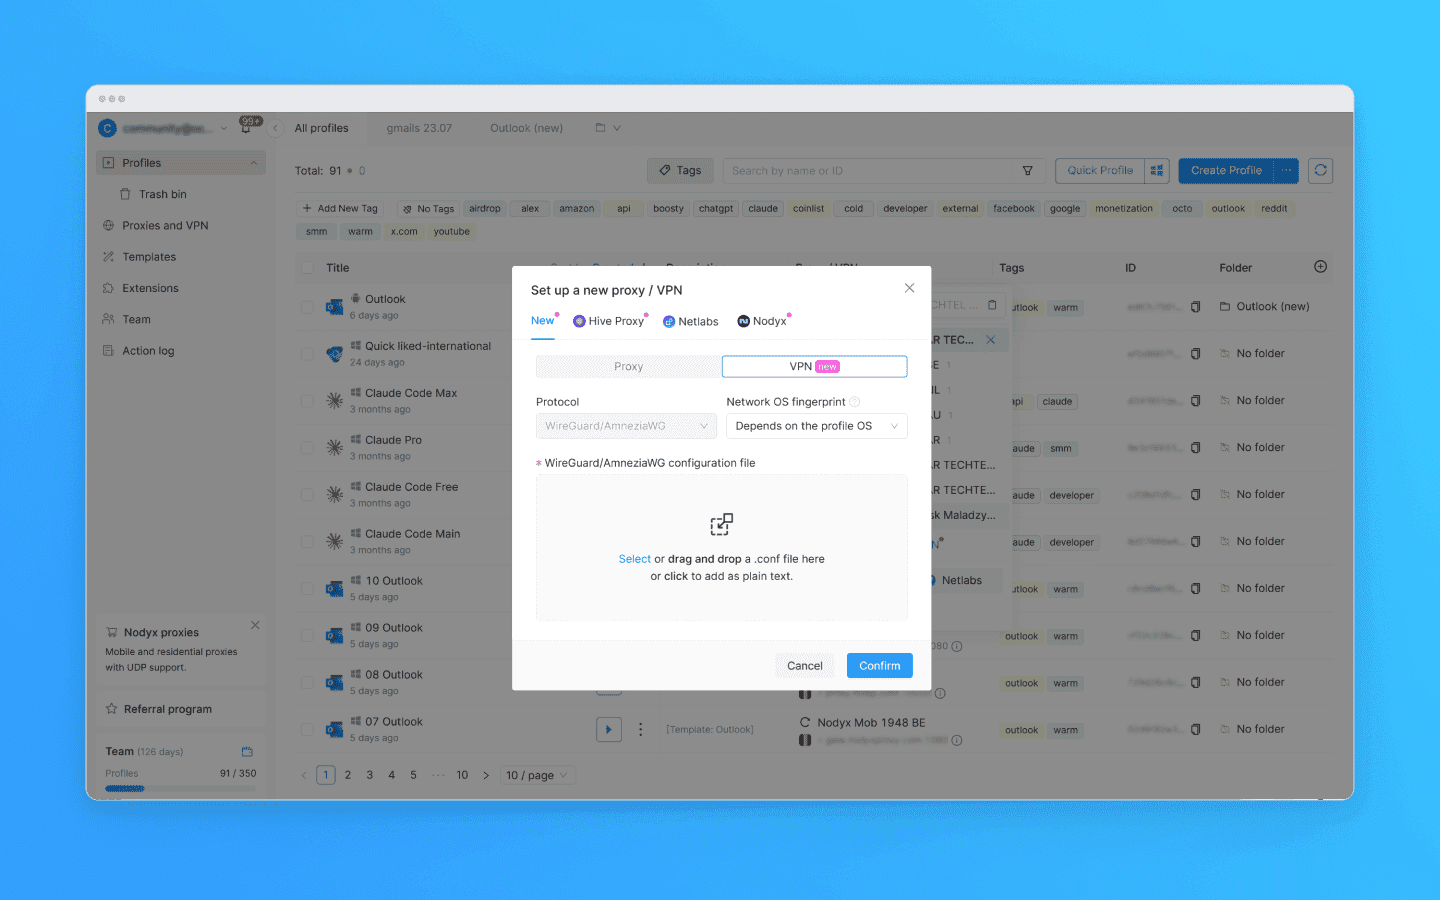
Adding a VPN to an Octo Browser profile
You can also save the VPN to the shared Proxies and VPN list and then assign it to profiles from the connection manager. Different profiles can use different VPN configurations simultaneously.
Conclusion
To connect a VPN to an individual Octo Browser profile, you don't need to install the VPN provider's desktop app. If the service lets you export a WireGuard configuration, you only need to get the .conf file and import it directly into the profile.
With Mullvad, you can select multiple locations at once and get an archive containing a configuration for each server. Proton VPN creates the configuration file separately for each selected server. In both cases, you'll get a standard file that can be uploaded to Octo Browser.
Would you like to try Octo Browser at а discount?
Use the promo code OCTOBLOG to get 30% off any subscription. This offer is valid only for new users.
Maintain your online anonymity with Octo Browser. Your real digital fingerprint cannot be tracked.
What is a configuration file
To connect WireGuard VPN to an Octo Browser profile, you need a file with the .conf extension containing:
WireGuard interface parameters;
a private key;
the VPN server address;
the server's public key;
routing and DNS settings.
This file is generated by the VPN provider. You can then import it into Octo Browser.
Important: A WireGuard configuration contains a private key. Treat the .conf file like a password for your VPN connection: don't publish it or post it in public chats.
How to get a WireGuard configuration in Mullvad
1. Sign into your account and open WireGuard configuration
Open mullvad.net and sign into your account. Mullvad doesn't use a username, password, or email address—you only need your 16-digit account number to sign in.
After signing in, the Account page will open. In the left-hand menu, find Downloads and select WireGuard configuration.
WireGuard configuration in the left-hand menu under Downloads
2. Generate a new key or import an existing one
On the WireGuard configuration file generator page, you'll need a WireGuard key. You have two options here:
Generate key: generate a new key pair directly in the browser.
Import key: paste an existing private key into the Enter private key field and click Import key. This lets you reuse a previously created key without using up the limit.
The limit is 5 keys per account. If the Generate key button is inactive and the red message You can only have 5 keys appears above it, expand the Manage WireGuard keys section at the bottom of the page and delete one of the keys using the trash icon.
Generate a WireGuard key: the Generate key button is disabled because the 5-key limit has been reached. Manage WireGuard keys: key name, creation date, and the trash icon for deleting a key
Important: After you delete a key, all configurations created with it will stop working. To avoid deleting a key that is still in use, check its name and date in the Created field.
3. Choose a country and city
In the Select one or multiple exit locations section, specify which servers your traffic should go through:
All countries: choose a country; you can select multiple countries.
All cities: choose a city; this field becomes active after you select a country.
All servers: choose specific servers within a city.
If you leave the default settings (All…), configurations will be created for the entire Mullvad network, and the archive will contain hundreds of files. It's therefore better to narrow your selection down to the country and city you need.
Advanced settings is an optional section containing additional connection parameters.
Under Configure Content Blocking, you can enable DNS-level blocking for specific categories: Ads, Trackers, Malware, Adult content, Gambling, and Social Media. The selected settings are saved in the configuration as a DNS server address. To change them later, you'll need to create the file again. If you don't need these settings, select None.
4. Download the generated configuration
Click Download zip archive. The archive will contain one .conf file for each selected server.
Location selection, content blocking, and the Download zip archive button
Extract the archive. Inside, you'll find ready-made .conf files—one for each selected server.
How to get a WireGuard configuration in Proton VPN
1. Sign into Proton and select VPN
Sign into your account at account.proton.me.
After signing in, the Welcome screen will open with a list of Proton services: Mail, Calendar, Pass, VPN, Drive, and others. Select VPN.
If this screen doesn't appear and you are taken directly to another service, you can switch to VPN from the service selection screen.
The Proton service selection screen. Select VPN
2. Open Proton VPN → WireGuard
In the left-hand menu, find WireGuard under Proton VPN. You will also see VPN apps, which contain ready-made apps, and OpenVPN, which contains configurations for another protocol.
The Proton VPN section in the sidebar, with WireGuard inside it
3. Select a server
Scroll down to the list of countries. They are arranged alphabetically, with the number of cities shown next to each country.
Expand the country you need using the arrow on the left to open the server table.
The table contains:
Name: the server name, for example
AT#127.City: the city where the server is located.
Status: the server's current load as a percentage: the lower the value, the more available capacity there is.
Icons next to Status: additional server features, such as P2P or IPv6 support. To see what an icon means, hover over it.
In the row for the server you need, click Create. If you need configurations for multiple servers, repeat this step for each one, and a separate configuration will be created for each server.
The server table for a country. The configuration file is created by clicking Create in the required row
4. Download the generated configuration
After you click Create, a window will open with the server name in the title.
The Text tab contains the configuration itself—you can select and copy it. To save it as a file, click Download. The .conf file will be saved to your device.
The generated configuration window. The Download button is in the bottom-right corner
Proton displays the private key only once. Copy or download the configuration before closing the window. Otherwise, you'll have to create a new one using the Create button.
The downloaded .conf file is a ready-to-use WireGuard configuration for the selected server.
It contains the private key in plain text, so it effectively acts as the password for the connection. Don't post such files in public chats or store them in publicly accessible locations.
How to add the configuration to Octo Browser
After downloading the .conf file, the remaining steps are the same for any VPN provider.
Open the settings of the required Octo Browser profile.
Click Add a new proxy / VPN under Proxy / VPN.
Select the VPN tab.
Upload the
.conffile you obtained or paste the configuration as text.Save the connection and assign it to the profile.
Adding a VPN to an Octo Browser profile
You can also save the VPN to the shared Proxies and VPN list and then assign it to profiles from the connection manager. Different profiles can use different VPN configurations simultaneously.
Conclusion
To connect a VPN to an individual Octo Browser profile, you don't need to install the VPN provider's desktop app. If the service lets you export a WireGuard configuration, you only need to get the .conf file and import it directly into the profile.
With Mullvad, you can select multiple locations at once and get an archive containing a configuration for each server. Proton VPN creates the configuration file separately for each selected server. In both cases, you'll get a standard file that can be uploaded to Octo Browser.
Would you like to try Octo Browser at а discount?
Use the promo code OCTOBLOG to get 30% off any subscription. This offer is valid only for new users.
Stay up to date with the latest Octo Browser news
By clicking the button you agree to our Privacy Policy.
Stay up to date with the latest Octo Browser news
By clicking the button you agree to our Privacy Policy.
Stay up to date with the latest Octo Browser news
By clicking the button you agree to our Privacy Policy.

Join Octo Browser now
Or contact Customer Service at any time with any questions you might have.
Join Octo Browser now
Or contact Customer Service at any time with any questions you might have.
Join Octo Browser now
Or contact Customer Service at any time with any questions you might have.